
Curves & Free Form
Two tools in the Voxel sidebar's Shapes accordion build solids by drawing rather than dragging out a box: Curve and, beside it, Free Form (and a third, Lathe, turns a drawn profile about an axis). Both are drawn by clicking in a Top, Front or Side view. A curve is a path in space that a cross-section is swept along — pipes, cables, handles, rails. A Free Form outline is a closed flat shape that becomes a solid with a thickness — logos, plates, cut-out profiles. Picking either tool opens the Numeric window, where their settings live.

Drawing a curve
Click Curve, then click in a Top, Front or Side view to add points. Each click adds a point to the end of the curve. Click and drag instead of just clicking and the new point's handles pull out as you drag, so one press-drag-release draws a smooth bend rather than a sharp corner.
- Backspace removes the last point.
- Return, Apply in the Numeric window, or clicking Curve again finishes the curve. Esc finishes it too, as does picking another tool.
- A curve needs at least two points; one with a single point is not kept.
A new curve is just a path: it has no solid until you give it a cross-section.
Curves, Lathes and Free Form outlines are all drawn with the bezier pen. Its five pens are in the corner of the view (P, + and - switch between them). You can drag any point straight away, even while still drawing: Shift slows it down, Ctrl keeps it to one direction, and it snaps into line with other points. Alt+click a point to switch it between smooth and corner, and Alt+drag a handle to break it.
To carry on with an existing curve, select it and click Curve. The tool picks that curve up rather than starting a new one: clicking empty space adds points from its end, clicking a span inserts a point there without changing the curve's shape, and you can drag handles to reshape it.
Editing points and handles
With a curve selected, click one of its points in a view to pick it; hold Shift or Ctrl to add points to the pick or take them out. The Numeric window then shows the picked points instead of the curve's own transform. Selected points show their handles in the views; drag a handle to bend the curve there.
To get back to the whole curve — its move, turn and size, its cross-section and taper — let go of the points: press Esc, click off the points in a view (on the curve itself or on empty space), or click Whole curve at the top of the Numeric window. Finishing a curve you are drawing shows the whole curve too.
To move points, drag them in a view (see dragging points). The Move tool works too: with points picked, only those points move; with none picked, Move moves the whole curve. Delete by default removes the picked points — an open curve keeps at least two points, a closed one at least three.
| Control | What it does |
|---|---|
| Closed | Joins the last point back to the first. Shown only when the first or last point is among the picked points, since those are the two ends a close joins. |
| Point position | With one point picked, opens X, Y and Z fields so you can type the point's position. Positions are in the curve's own frame, which starts at the first point drawn. |
| Handles | The handle mode of the picked points (see below). With a mixed pick, none of the four is lit. |
| Corner radius | Shown when the picked points are corners. Rounds the corner with an arc of this radius, so one straight run turns into another without a sharp bend; 0 is a sharp corner. The point itself does not move — the curve cuts the corner. Two rounded corners that would overlap on one span are trimmed automatically. |
Handle modes
Curves and Free Form outlines share the same four handle modes:
| Mode | What it does |
|---|---|
| Corner | A sharp corner: no handles at all. |
| Aligned | Smooth: the two handles stay in line, each keeping its own length. |
| Mirrored | Smooth and even: the two handles stay exact opposites. |
| Free | Each handle moves on its own. |
A corner's radius is kept when you switch it to another mode, so switching back to Corner brings the rounding back. Using Corner points with a Corner radius is the quick way to make a pipe of straight runs with rounded bends.
The curve cross-section
With a curve selected, the Numeric window shows Curve Cross-section: a dark square paint area, split into quarters, with the curve running through its centre. The shapes you draw in it are swept along the whole curve to make the solid — a circle gives a round tube, a rectangle a square bar, two shapes side by side a twin rail.
| Tool | What it does |
|---|---|
| Rectangle | Drag it out. Ctrl makes a square. |
| Ellipse | Drag it out. Ctrl makes a circle. |
| Polygon | Click to drop points; Ctrl-click for a smooth point. Click the first point, press Return, or pick another tool to close it. Esc abandons the polygon in progress. |
Click a lit tool again to put it down. With no tool picked, click a shape to select it, then drag it to move it, drag a corner square to scale it (Ctrl keeps its proportions), or drag the round knob above it to turn it. Delete removes the selected shape.
| Control | What it does |
|---|---|
| Size | How wide the paint area is along the curve — the whole square, edge to edge. This is what sets the real thickness of the tube. |
| Clear | Removes every shape from the cross-section. |
Taper & spiral
Open Taper & spiral below the paint area to vary the cross-section along the curve — a horn, a tapering tentacle, a twisted bar.
| Control | What it does |
|---|---|
| Start width | How wide the cross-section is at the start of the curve, as a percent of the size drawn (0–200%). |
| Start length | How far along the curve the start width grows to full size, as a percent of its length (0–50%). |
| End width | How wide the cross-section is at the end of the curve (0–200%). |
| End length | How far back from the end the cross-section shrinks or grows to the end width (0–50%). |
| Spiral | How many full turns the cross-section makes along the curve. Negative turns the other way (−100 to 100). |
| Bend steps | How many straight steps each rounded corner is built from (1–64). More is smoother; 1 is a single mitred cut across the corner. On a curve with many corners the number is reduced automatically, and the window says which value is in use. |
| Sharp corners | Makes every corner of this curve sharp, whatever radius its points carry. The radii are kept, so turning this off rounds them again. |
Freezing a curve
While it is a curve, everything above stays editable. When the shape is final, right-click the curve in the Voxel Tree and choose Freeze Curve. The curve and its cross-section go, the solid they made stays, and it can no longer be reshaped through its points. Freeze Curve is greyed out until the curve has a cross-section — without one there is no solid to keep.
Drawing a Free Form outline
Click Free Form, then click in a Top, Front or Side view to drop anchors. Drag instead of clicking to curve the anchor as you place it. Backspace removes the last anchor. While you draw, you can drag any anchor already placed, and the Handles buttons in the Numeric window set the mode of the selected anchor; every bezier pen works here.
To finish, click the first anchor or press Return: the outline closes and becomes a solid. An outline needs at least three anchors to close. An outline that never closed has no solid in it, so it is dropped when you press Esc or put the tool away; Esc on a closed outline only puts the tool away and keeps the shape.
Thickness and corners
The Numeric window shows the outline's settings, and which plane it was drawn on (XZ (Top), XY (Front) or YZ (Side)).
| Control | What it does |
|---|---|
| Thickness | How thick the outline is, centred on the plane it was drawn in. This is the node's size along that axis, so the Scale tool changes the same number. |
| Corner radius → Top | Rounds the rim where the side wall meets the face on the + side of the drawing plane. Half the thickness is as far as it goes. |
| Corner radius → Bottom | The same for the other face. |
| Link | Edit one rim radius and the other follows. Untick it to round only one rim, or the two by different amounts. |
Editing an outline
Select a closed outline and pick Free Form to edit it. Click an anchor to select it, a span to add one, or drag a handle to curve it. Double-click an anchor to smooth it. Drag on empty space to lasso several anchors at once, or hold Ctrl as you start the drag for a box; Shift adds to the selection. Drag selected anchors to move them, and press Delete to remove them — an outline keeps at least three. The Corner, Aligned, Mirrored and Free buttons set the handle mode of the selected anchors, as for curve points.
Picking Move, Rotate or Scale puts the pen away and hands the outline to the gizmo; the closed outline is kept.
Applying an outline
While its anchors exist, an outline stays exact and editable. Apply in the Numeric window turns it into an ordinary solid and its anchors go — Undo is the way back. Above it, the window shows what Apply will bake: the sample grid, its memory and its cell size. Curved edges come out as a staircase of that cell, which follows the scene's voxel size, so a finer voxel size gives a cleaner edge (and a bigger object). See Voxel Size & Preview Detail.
Lathe
Lathe, beside the Sphere Chain in the Shapes accordion, turns a drawn profile about an axis into a solid — vases, bottles, knobs, chess pieces, nuts and springs. Click it and a line in the action colour appears in the Front and Side views: the axis. Click beside it to draw the profile the same way as a curve: each click adds a point, a drag pulls out the point's handles, Backspace removes the last point, and Return or Apply finishes. A point dropped on the line snaps onto it, so a vase's bottom and neck close without a pinhole. The solid shows as soon as the profile has two points.
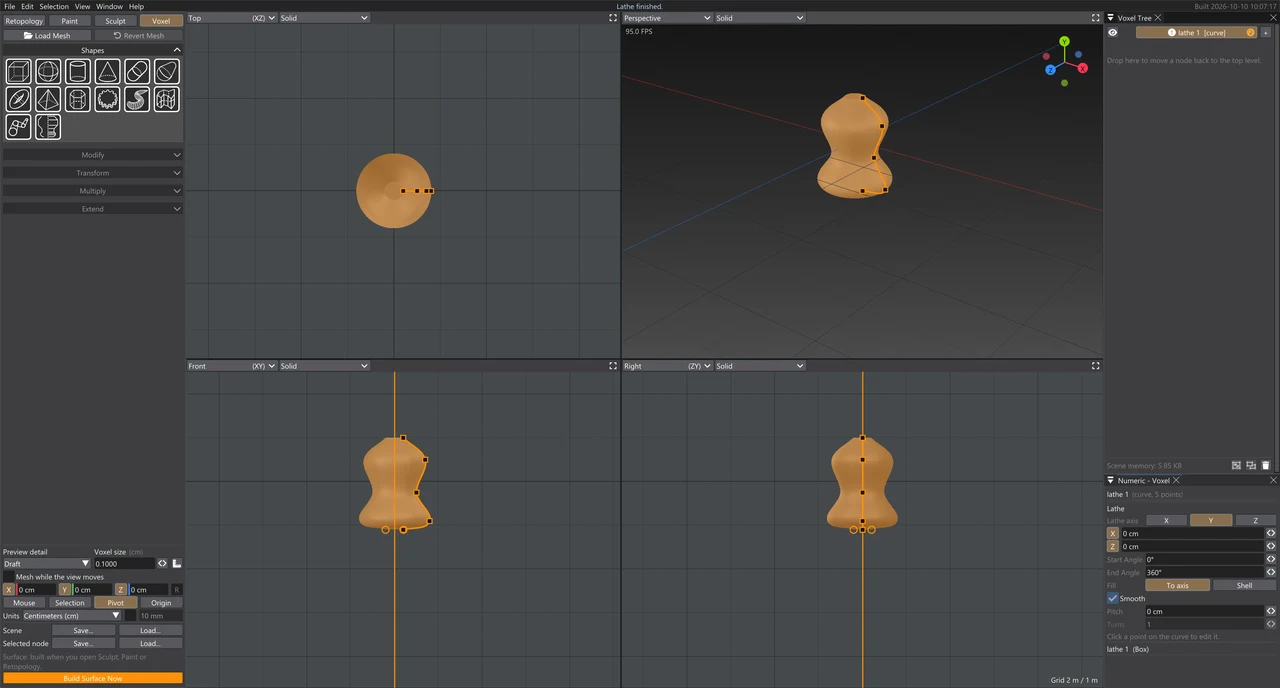
To move the axis, drag either of the two circles on the line — before you draw or afterwards. A press on the line itself still adds a point, so points can be put on the axis. With the tool off, selecting a lathe shows its axis again, and its points and handles edit as a curve's do. Picking Lathe again with a lathe selected carries on drawing that one.
| Control | What it does |
|---|---|
| Lathe axis | X, Y or Z: the axis the profile turns about. Draw the profile in a view the line runs across. |
| Axis position | Where the axis passes, typed in world units (the circles drag the same thing). |
| Start Angle, End Angle | How far round it turns, in degrees; 0 is where the profile was drawn. 0 to 360 is a whole turn; less leaves a slice out, with flat ends. |
| Fill | For an open profile: To axis fills the space between the profile and the axis (a solid vase); Shell gives the profile a wall of the Thickness below it (a cup or a lampshade). A closed profile is solid as drawn — a ring, a tyre. |
| Smooth / Sides | Round all the way, or made of that many flat sides: 6 gives a hex nut, 8 an octagonal column. Every part of the profile gets the same number of sides. |
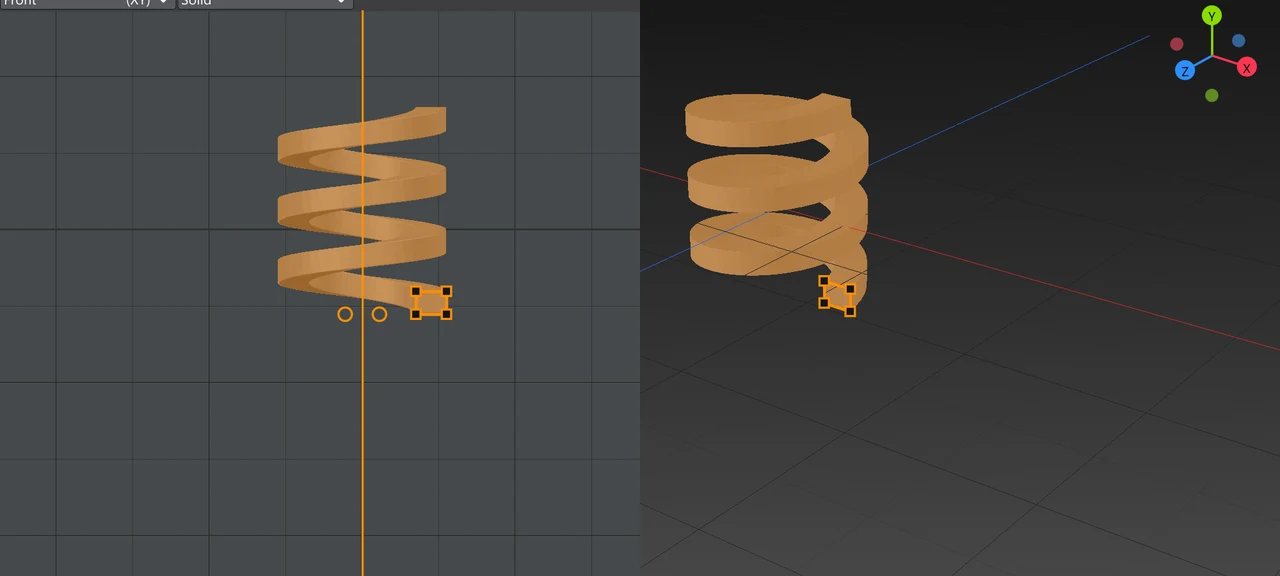
| Pitch | How far the profile climbs along the axis each turn: a spring, a screw thread, a spiral ramp. 0 is a plain lathe; negative climbs the other way. |
| Turns | With a Pitch, how many times the helix goes round. The last turn ends at the End Angle. |
Spinning a shape
Select a shape and click Lathe, and the selected shape itself is spun round the axis instead of a drawn profile: everything it passes through on the way round becomes solid. A box beside the axis becomes a ring, a sphere a doughnut, a shape the axis runs through a round version of itself. Any shape works — a primitive, a curve, a Free Form, a group, or a mesh brought into the Voxel tab.
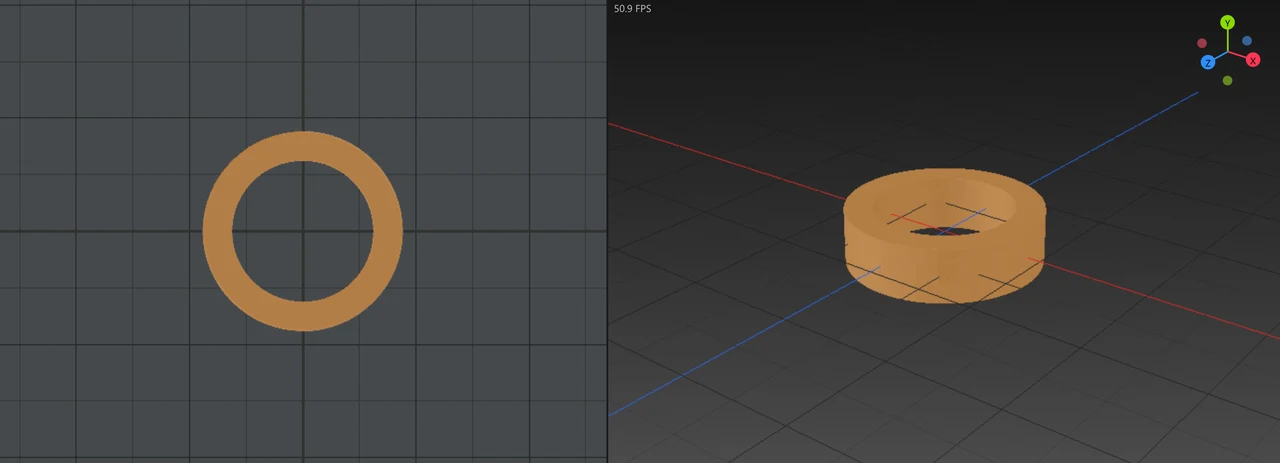
The new lathe takes the shape's place in the Voxel Tree, as Lathe of its name, and the shape goes inside it, hidden. Select the shape there to move, resize or edit it: the lathe follows when you let go. Drag the axis line's circles to move the axis, and use the Numeric window's angles, sides and helix as for a drawn profile (a spun shape has no Fill or Thickness). The axis used is the one the Lathe tool is showing; with nothing selected, Lathe draws a profile as before.
A part turn starts and ends where the shape itself does, so 0 to 90 degrees sweeps the shape a quarter turn from where it sits. A locked shape, or a live clone or mirror, cannot be spun; unlock or flatten it first.
In Sculpt, Shapes has a Lathe button too: it spins the mesh selected in the Sculpt Tree round the same axis and adds the result to the sculpt as a new mesh, Lathe of its name. The original mesh is kept. The mesh should be a closed solid.
A lathe stays editable until you right-click it in the Voxel Tree and choose Freeze Lathe, which keeps the solid and removes the profile, as Freeze Curve does. Mirror and Mirror Mode copy a lathe like any other shape.