
Stitch Creator
The Stitch Creator builds the stitch brushes the Stitch Tool lays. You make the artwork in an image editor — Photoshop, Krita, Substance Designer — as one tall sheet: a single column of pieces, the end cap at the top, the variants in the middle, the start cap at the bottom, and any corner pieces. The Creator stacks one image per kind of information on that sheet (colour, height, masks, roughness and so on), says which rows are which piece, checks that the pieces join, and saves the lot as one .vxstitch file.
Open it from Window > Stitch Creator, from New... or Edit... in the Stitches accordion, by double-clicking a brush’s thumbnail there, or by double-clicking a .vxstitch file in Explorer. It is a window of its own and does not dock.
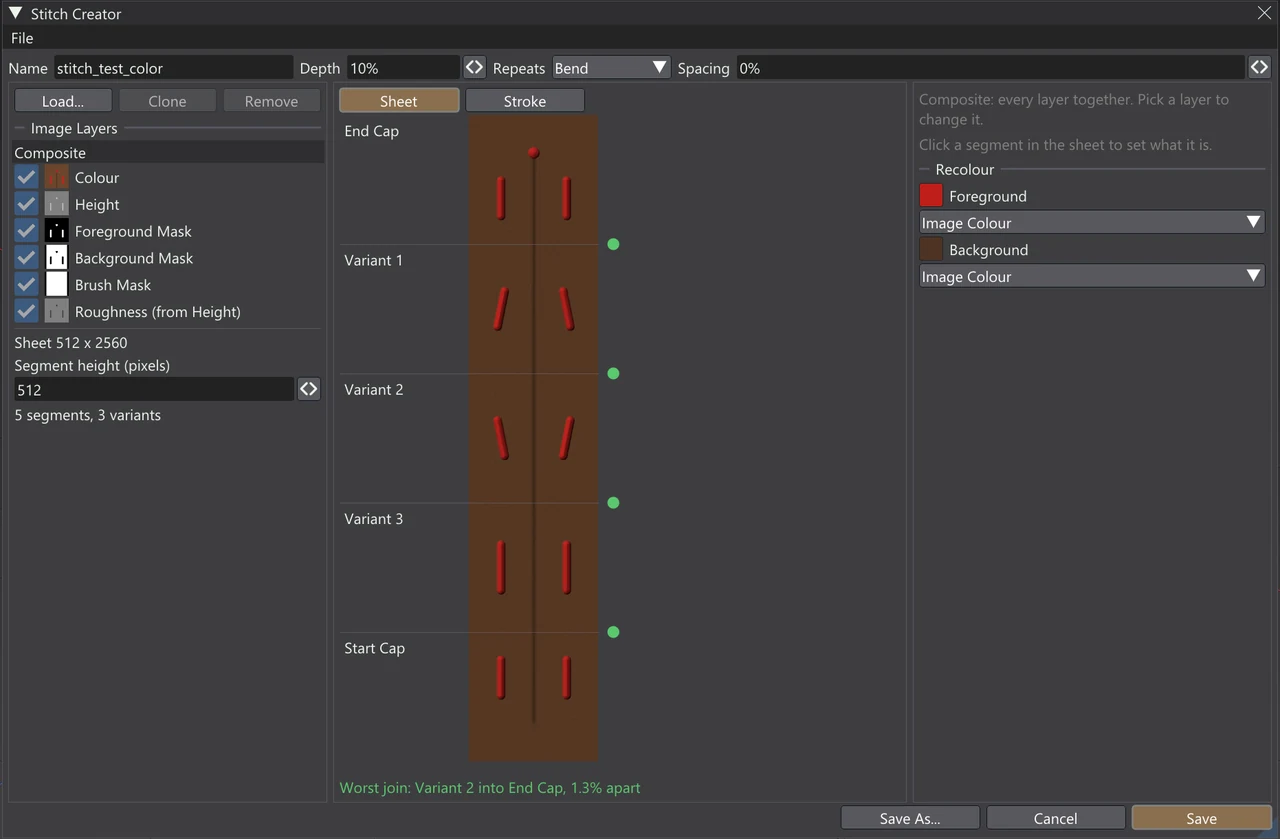
The sheet
Every image of a brush is the same size: one sheet, one column wide. The sheet is cut into equal rows — Segment height (pixels) under the layer list sets how tall a row is, and the line under it says how many segments and variants that makes. A plain strip piece is one row; a corner, T or cross piece is square (as tall as the sheet is wide), which may take more than one row. With three or more rows, the top row starts as the End Cap, the bottom as the Start Cap and those between as Variants; change any of them below.
The middle column shows the sheet (Sheet) or the brush laid along a sample stroke (Stroke, with Re-roll for new random picks). On the sheet the mouse wheel zooms and the middle mouse button drags; click a segment to select it. A dot on each border between segments shows how well the two pieces meet — green good, amber visible, red a seam — and Worst join under the sheet names the worst pair, with how far apart they are as a share of the range. Every pair that can follow one another is checked, flipped as the segments allow.
Image layers
Load... reads an image (8 or 16 bit; PNG, TIFF, JPEG XL and the other formats Vertexix reads) as a new layer. Its role is guessed from the file name (_height, _disp, _normal, _metal, _rough, _emis, _ao, _color...) and then from the picture (a grey image is taken as height); change it if the guess is wrong. An image of another size is fitted to the sheet, with a note saying so. Clone makes a new layer from the selected one and linked to it — for a roughness made from the height, say: give the clone a role, then a Channel, Levels or Invert. Remove deletes the selected layer; layers made from it keep how they look now. The eye on each layer shows it in the Composite, which draws every layer together: the colour lit by the relief.
Roles
| Role | What the tool does with it |
|---|---|
| Colour | The strip’s colour (the file’s main image). |
| Height | The relief: raised in Sculpting, and painted into the Height, Normal or Displacement channel in Painting. Zero level is the grey that means “the surface”. |
| Vector Displacement | A relief that moves points across, along and out of the strip — overhangs a height cannot make. Tangent space, or Object space. |
| Normal | A normal map of the strip, painted into the model’s Normal Map. |
| Foreground Mask / Background Mask | Which parts the Stitch Tool’s two recolour swatches act on (the thread, the leather round it). |
| Brush Mask | Where the strip is at all: black is not laid. The brush’s transparency. |
| Metallic, Roughness, Emissive, AO | Painted into those channels. |
Each role can be used once. A brush with no Height or Vector Displacement layer paints but never sculpts — the Creator says so, in amber.
Layer settings
| Control | What it does |
|---|---|
| Role | What this layer is to the brush. |
| Source | Image file, or Made from another layer (a clone stays linked: change that one and this follows). |
| File / Replace Image... | The image the layer came from, and a new one in its place. |
| Channel | Which channel of the source this layer reads: Luminance, Red, Green, Blue or Alpha. |
| Invert / Levels | Turn the values over; stretch a range of them to the full range. |
| Zero level | Height, Vector Displacement: the value that means “no change”. Guess from the Sheet sets it to the value most of the sheet has. |
| Strength | Height, Vector Displacement, Emissive: up to 10. |
| Precision | How the layer is stored: 8-bit, 16-bit or 32-bit float. Relief layers keep float. |
Segments
Click a segment on the sheet to set what it is (Is a):
| Kind | Where the tool lays it |
|---|---|
| Start Cap / End Cap | At the ends of an open path (when the Stitch Tool’s caps are on). |
| Variant | Along the path, picked at random by Weight (2 is twice as often as 1) or in order. |
| Corner, Inner Corner, Outer Corner | At a turn sharper than the tool’s Corner Angle. Draw a Corner and an Outer Corner as a right turn (in from the bottom, out to the right) and an Inner Corner as a left turn; a missing one is made by mirroring another. |
| T Junction, Cross | Where stitches meet (see Where stitches meet). Draw both as square pieces with the through stitch running from the bottom to the top; a T Junction’s branch leaves to the right (it is mirrored for a branch from the left), a Cross’s leaves both ways. |
| Unused | Never laid. |
Random flip X lets a variant be laid mirrored across the stroke sometimes; Random flip Y reversed along it (its two ends must then match each other). Rows sets how many rows a square piece takes.
Brush settings
The row along the top holds the brush’s Name and the defaults the Stitch Tool starts from: Depth (how deep the relief is, as a share of the strip’s width), Repeats (Bend with the path, or Rigid), and Spacing. The second row holds Tags — words, separated by commas, that the library’s search finds the brush by — and Real width, how wide the strip is in reality in millimetres (0 when not given), which the Stitch Tool’s Real size lays it at. Recolour on the right sets the starting Foreground and Background colours and modes (Image Colour, Tint, Replace) — see Recolour.
Saving
Save writes the brush to its file (the first time, you choose where); Save As... saves a new .vxstitch in your stitch library; Cancel closes the window without saving. The File menu has New, Open..., Save, Save As... and Close; closing, opening or starting a new brush with unsaved changes asks first. A saved brush stores a square thumbnail for the library and appears in the Stitches accordion at once.
A .vxstitch file is a lossless JPEG XL with the extra layers as named channels: an image viewer that reads JPEG XL shows its colour. Opening a saved brush again keeps every layer, with the recipe of each layer made from another; the original image files are not needed.
When Vertexix is installed with its file types, Windows Explorer shows each .vxstitch file’s own thumbnail, the same square picture the library uses. A brush saved before the square thumbnails shows its older, wider sample stroke.
Editions
Saving a brush and importing one are part of Regular and Ultra. In Free and Light the Stitch Creator opens and previews everything, but Save and Save As... are locked, and the Stitch Tool lays the brushes that ship with Vertexix.