
Bringing a Model In
Before a model can be split it has to come into the Model Splitter, be set to the size you want to print it at, and be a closed solid — a surface with no holes, so the slicer and the cuts can tell inside from outside. This page covers all three: where a model can come from, the Change Model Size prompt, and the Model accordion with its checks, scaling and repairs.
Where a model comes from
When you open Window > Model Splitter with nothing in it, the model on screen comes in by itself: the Generated Mesh (every Sculpt mesh) when there is one, otherwise the Loaded Mesh. To bring in something else, use the window’s File menu:
- Open Model... reads a file straight into the splitter: STL, 3MF, OBJ, PLY, FBX, glTF / GLB or DAE. It does not touch the model in the main view.
- Use the Loaded Mesh brings in the model you imported into Vertexix.
- Use the Selected Sculpt Meshes brings in the meshes selected in the Sculpt Tree, as one model.
Whichever you choose, the splitter takes its own copy. Scaling, repairing, rebuilding and cutting all happen to that copy; the original mesh is never changed. If the splitter has unsaved work when you bring in a new model, it asks first whether to save it (see the working file).
Change Model Size
3D printing works in millimetres, and the splitter does too: every length in it is in mm. As each new model comes in, the Change Model Size prompt asks how big it should be.
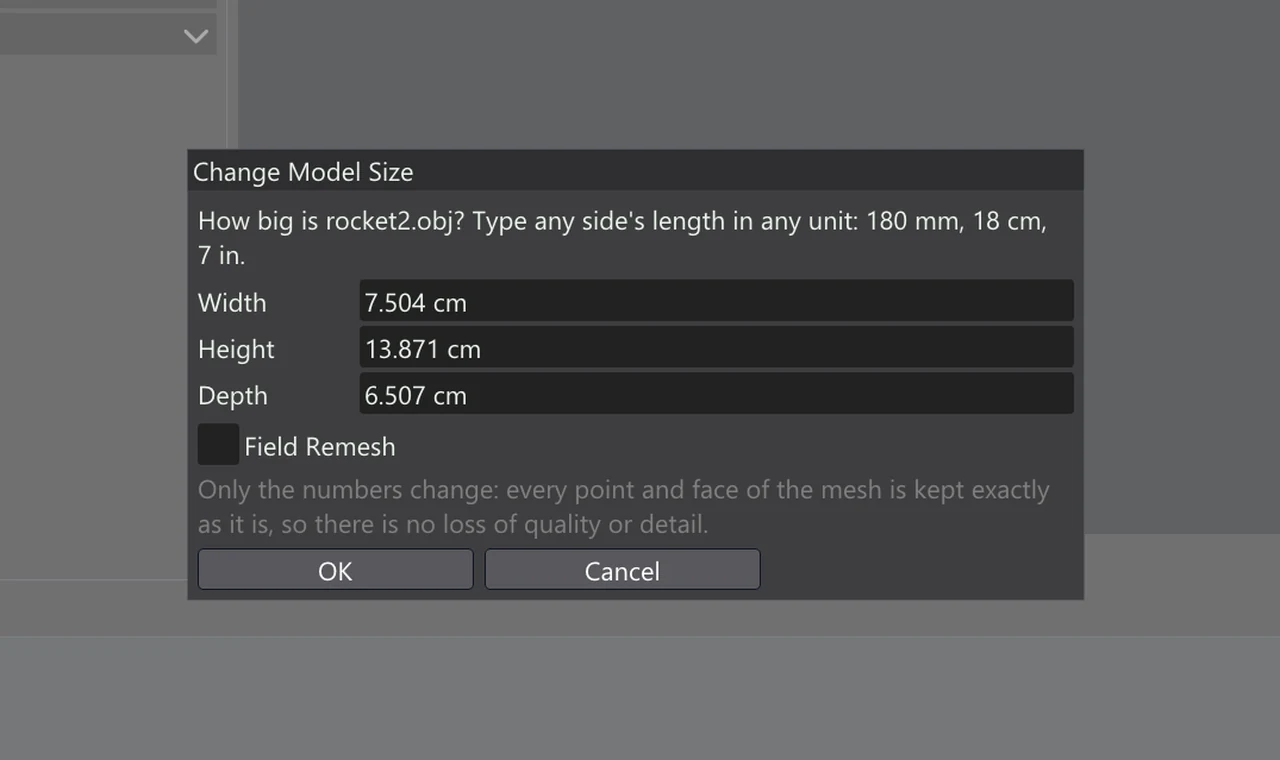
- Width, Height and Depth show the size the model will be. Type a new length into any one of them and the other two change with it: the model is always scaled evenly, never stretched.
- Type the length in any unit:
180 mm,18 cm,7 in,1.8 m, feet and inches such as2'5", even a sum such as100+20. A bare number is read as millimetres. - The fields start at the size the model’s own numbers most likely mean. Vertexix’s own meshes (the Loaded Mesh and Sculpt meshes) are in metres, so a 1.8 m figure starts at 1800 mm; a file whose largest side reads like a print in millimetres starts as millimetres. Always check the size shown before you press OK — a model read in the wrong unit is 10, 25 or 1000 times off.
- OK sizes the model. Cancel drops the model you were bringing in.
Changing the size only changes the numbers. Every point and face of the mesh is kept exactly as it is, so there is no loss of quality or detail — unless you also tick Field Remesh, below.
Field Remesh
Field Remesh rebuilds the model before you split it, the way Sculpt’s Rebuild does: its whole surface is laid down again as even quads, and pieces that overlap or poke through each other are fused into one closed solid. That makes it the quickest fix for a model built from separate intersecting parts (a figure with its eyes, teeth and hair as loose shells, say), and it gives the parts an even, clean mesh.
It is offered in two places: as a tick in the Change Model Size prompt (the model is sized, then rebuilt), and in the Model accordion at any time, with a Rebuild button.
- Rebuild detail sets how dense the rebuilt mesh is, compared with the model: 1 gives it about the polygon count it already has, each level above doubles it and each level below halves it. The line under it gives the polygon count you will get (“About 2.8 M polygons.”). The smallest voxel size your edition allows still applies.
- Detail finer than one quad is lost, and colours do not come across.
- Once a model has been rebuilt this way, the Model accordion says so, and the faces the cuts make are filled with quads of the same size, as Sculpt’s own cuts fill theirs, rather than with long thin triangles. Sent to Sculpt, the parts arrive as quads.
- Rebuilding from the Model accordion keeps your cuts where they are; press Apply Cut to cut the rebuilt model.
The Model accordion
The Model accordion at the top of the left column describes the model in the splitter: its name, its size in mm, and how many points and triangles it has. It opens by itself when a model comes in with a problem — one that cannot be cut, or has overlapping pieces, sheets or pieces too close together; otherwise the Cuts accordion opens.
The solid check
Under the counts, the check says whether the model can be cut:
- In green, A closed solid: ready to split., with its volume in cm³.
- In orange, the reason it is not: for example that it is not a closed solid, with how many edges lie on holes and how many are shared by more than two faces; or that it is inside out, its faces pointing in.
- How many separate pieces it is made of, when more than one.
- In orange, when some of the pieces are sheets with no depth: surfaces with nothing behind them, such as the single-sided armour plates, capes and cards of a game model. A printer cannot make a surface with no thickness. Show Sheets colours them red on the model, both sides, so you can see which they are; Thicken Sheets gives them depth and Delete Sheets takes them out. (A piece with a few small openings is not a sheet: Fill Holes closes it.)
- How many triangles have no area — three corners on one line. Slicers stumble on them; Simplify removes them.
- How many holes go right through the model, as the hole in a ring or a mug’s handle does. This is not a fault: it is there so a hole you did not expect can be found.
- In orange, when two pieces come closer than the Gaps under value (0.30 mm to start with) without touching: they may print joined. Set the value to the narrowest gap your printer keeps open.
- In orange, when some of those pieces overlap each other — a model built from parts pushed into one another, as many kit-bashed models are. Such a model is closed, but the walls buried inside it would stay inside the parts after a cut, as thin hollow slivers. The check then does not say it is ready, and offers Merge Overlapping Shells. (A hollow model’s inner wall is not an overlap, and pieces that only touch are not either.)
A model that is not a closed solid cannot be cut: the Cuts accordion is greyed and the status line says why. Use the repairs below until the check turns green.
Scale
To change the size after the prompt, type a height in the field and press Set Height, or type a percentage and press Scale. Both scale the model evenly, keep every point, and carry the cuts, carves, seams and drain holes with it. Connectors keep their own sizes in mm: a peg does not grow with the model. A change of scale starts the undo history afresh.
Repair
The repair buttons are offered, never forced. Each reports what it did on a line under the buttons. Try them roughly in this order:
| Button | What it does | When to use it |
|---|---|---|
| Merge Overlapping Shells | Joins pieces pushed into each other into one solid, exactly: nothing is rebuilt, so the detail and colours outside the overlaps are kept. A hollow model’s inside stays hollow. | When the check says pieces overlap. Try this before the voxel repairs: it loses nothing. |
| Weld Points | Joins points that sit at the same place. | An STL file, or any model split along its seams, is open until its points are joined. Try this first. |
| Fill Holes | Closes holes of up to 64 edges with new faces. Larger openings are left alone. A model split along its texture seams is looked at as if welded, so a seam is never mistaken for a hole. | Small gaps from a scan or a careless export. |
| Fix Winding | Turns faces that point the wrong way to agree with their neighbours, and turns an inside-out model right way out. | When the check says the model is inside out. An inside-out model would keep the wrong side of every cut. |
| Remove Specks | Drops tiny loose pieces of fewer than 12 points. | Scan debris floating around the model. |
| Thicken Sheets | Gives every sheet the thickness set on the slider under it (Thickness 1.20 mm), half to each side, and closes it round its edge: a solid of its own, its colours kept. The rest of the model is not touched. | A game model whose armour, cloth or hair is single surfaces. A sheet laid on another piece then overlaps it — follow with Merge Overlapping Shells. |
| Delete Sheets | Takes every sheet out of the model. | Decorations that should not be printed. |
| Simplify | Removes triangles with no area and joins points wherever that moves the surface less than the tolerance on the slider under it (Tolerance 0.010 mm). Colours are kept where they change. | A closed solid with slivers or far more points than its shape needs. |
| Seal Through Voxels | Rebuilds the model as a closed surface from voxels of the size set on the slider under it (Voxel 0.50 mm, say). | The last resort: it always gives a solid, but detail finer than one voxel is lost and colours are dropped. |
A game model made of single surfaces usually takes three presses: Thicken Sheets, then Fill Holes for the pieces that only had small openings, then Merge Overlapping Shells to join the thickened plates to what they lie on.
For a model made of several overlapping pieces, Merge Overlapping Shells is the exact fix. Field Remesh and Seal Through Voxels fuse overlapping pieces too, as they rebuild the surface — at the detail you choose, and without the colours.
Big models: the lighter preview
Cutting a model of several million triangles takes time, and the view would lag behind every change. With Lighter Preview for Big Models ticked (in the Model accordion), a model with more triangles than the slider under it (Preview at 500k triangles to start with) is first cut on a lighter copy, so cuts and connectors show up quickly. As soon as those parts are on screen and you stop changing things, the splitter works the parts out again at full detail behind them, and the full-detail parts take their place in the view. While that happens the Model accordion says Showing a lighter copy (… of … triangles) while the full detail is worked out.
The lighter copy is only ever for the view. Export Parts... and Send Parts to Sculpt always cut the model itself, at full detail — if the full-detail parts are not ready yet, they are worked out first and the status line says so. Every edition has it: Vertexix is exactly as fast in Free as in Ultra.