
Drawing Patches
The Pencil builds quads from lines you sketch freehand: the patch appears the moment you let go. Strip and Rails build quads from curves you place point by point. Both draw the same way, show a live preview of the quads they would make, and make them when you press Enter. Patch is different: it is built from points of the quads you pick (see Patch).
Pencil
The first tool on the Create tab. Drag on the model to draw a line. When you let go, any area the line closes becomes a patch of quads straight away.
- Against the quads you have. A line that starts and ends on the edge of existing quads closes the area between itself and that edge. The patch grows out of the edge, and the edge keeps its count: the new quads continue the existing ones, line for line.
- With one end free. Leave one end of the line in empty space and the Pencil closes the area for you, with a straight line from that end to the nearest corner of the quads (shown grey).
- Between two patches. A line from one patch to another fills the area between them, both edges keeping their counts. If the two patches do not touch, their nearest corners are joined to close it.
- Over the quads. Where a line runs over quads you have kept, it cuts them. The parts of the line on the bare model carry on from the quads' edge where it leaves them.
- Lines crossing lines. Lines that cross each other close areas too: four lines in a “#” make a patch in the middle, three crossing lines a three-sided one, and a loop drawn back to its start a patch inside it. Lines that do not close anything yet stay on screen until they do.
Areas with four sides become a grid. Areas with three, five or six sides get all-quad layouts with a point inside where the quads meet; when an existing edge leaves no room for that (a side only one edge long), the area is made as a grid instead. An area that cannot be made at all is outlined in red and the status line says why.
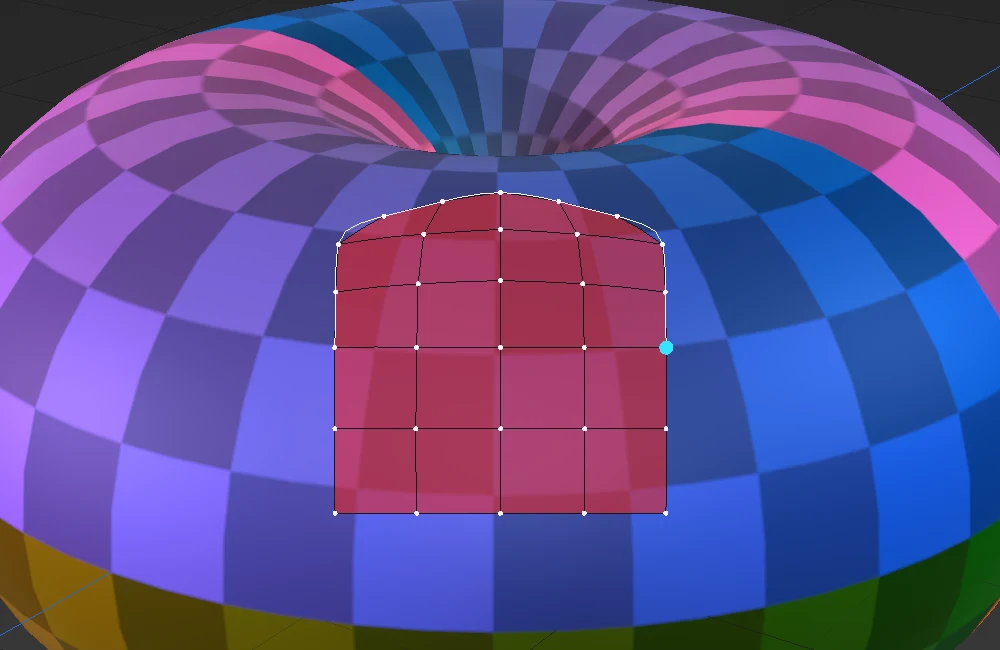
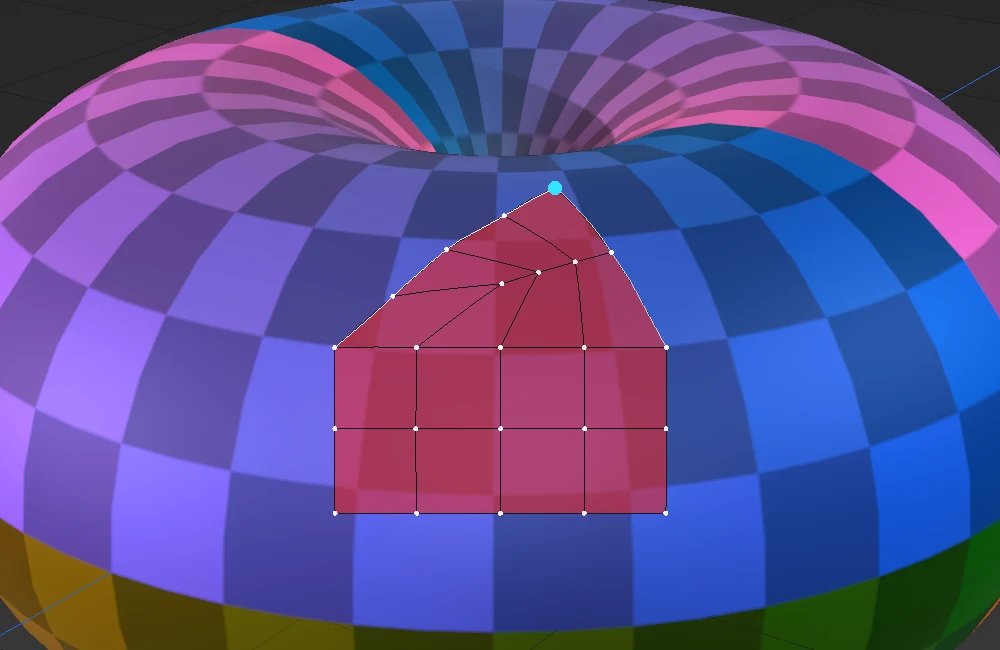
Vertex points
Both ends of every line you draw become vertex points (shown as dots), as are the open edges' points of the quads you have. Start or finish a line within a few pixels of a vertex point and it snaps there: the point is ringed while you hover and while you draw, so you can see where the line will end. Lines that meet at a vertex point are joined, so you can build an area from several lines drawn one after another, each starting where the last one ended.
Cutting quads
Draw the Pencil across quads you already have and it cuts them. There is no switch for this: it happens wherever the line runs over kept quads. The cut never follows your line exactly. Every edge the line crosses gets one new point, at the middle of the edge, and each quad is cut between those points:
- Straight through (in one side, out of the opposite side): the quad becomes two quads.
- Round a corner (in one side, out of the next): the quad becomes three quads around a new point in its middle. The layout stays all quads.
- Ending inside a quad (where you let go, or where the line started): the quad keeps the new point on the edge the line came in by, and nothing else. A quad becomes a 5-sided polygon (shown as one face, exported as an n-gon), and a triangle becomes a quad. A 5-sided polygon can be cut through again later.
- Across from the model to the model: the quads' outer edges get their new points too, so a line drawn right across the quads leaves them all quads.
- Round and back to the quad it started in: a closed ring.
- From or to a point of the quads. Over the quads, the Pencil also snaps to their own vertex points, including the ones inside them, not just their outer edge; the point under the cursor is ringed. Start or let go on one and the cut runs right to that point, with nothing new made there. The quad the cut leaves the point by is split from it: to the middle of one of its edges, a triangle and a quad (a quad with one extra point has five corners, so one half is always odd); to the opposite corner, two quads meeting at a new point in its middle.
The new points are placed on the model's surface, along the surface normal, so the cut quads follow its curve. Wobbles are ignored: a line that crosses an edge and comes back, or circles a point, cuts once. With Mirror Mode on, the mirror image is cut as well. One Ctrl+Z undoes the whole cut.
A line that cuts leaves no stray Pencil line behind. A short run-up on the bare model before the quads (or a short run past them at the end) is part of the cut, not a line of its own. In the same way, a line drawn on the model whose very start or end runs only a few pixels onto the quads does not cut them.
So that extending quads still works as it always did, two kinds of line do not cut. One is a line that only touches a single quad at the edge of your quads (for example, starting just inside the edge row and drawing out). The other is a line drawn out from one of the quads' vertex points across a corner of the quad beside it, that is, along that quad's side rather than through it.
With Mirror Mode on
- A line cannot cross a mirror plane: it stops on it, and its end there becomes a mirror axis point (drawn magenta).
- A line started on a mirror axis point follows the axis: it runs along the plane's line over the model, wherever you drag, and ends on the axis.
- A line can end on any mirror axis point, joining it.
- An end on the axis is left for you to close; the Pencil never joins it to the nearest corner by itself.
So for a patch on the centre line, draw from your quads to the axis, along the axis, and back. The patch is made on your side and mirrored on the other, the two sharing their edge on the axis.
Keeping and dropping a patch
A new patch stays live until you keep it, and while it is live you cannot draw: a press on the model draws nothing, and the status line says to keep the patch first. You can still pick and drag its points, edges and quads, and the quads around it, as with no tool. The first drag on the live patch keeps it, so its counts are fixed from then on and a drag is never undone by a change of count.
- Up / Down and Left / Right: the rows and columns of the live patch under the cursor (Shift for steps of 5). The counts they change show in the Pencil settings as X and Y. They carry on from where they are while the cursor stays on that patch, or wanders off every patch; they start again only on another patch.
- Ctrl+mouse wheel: the edges along the line you drew (the same as the slider in the Pencil settings).
- Enter or Space keeps the patch. Changing tool keeps it too.
- Esc takes the live patch and its lines away.
- Backspace takes back the last line, and the patch is made again from the rest.
- Ctrl+Z undoes one line, one key press, one keep at a time.
Pencil settings
- Circle (the third button, beside Grid and Rings; lit while on): the Pencil draws a perfect circle. Press where its centre should be and drag out its radius; the circle follows the mouse, and letting go makes it, filled the way Grid or Rings says. While Circle is on the counts have a ceiling: with Rings, at most 32 edges round and 4 rings; with Grid, at most 12 for Edges along the line, X and Y. The sliders, the arrow keys and Ctrl+wheel all stop there, and a big circle's own count is held to it too.
- Auto patch: on, a line that closes an area makes its patch the moment you let go. Off, lines are only drawn, but every area they close is shown at once, outlined and lightly filled in green (the status line counts them). Create Patch (under Auto patch), Return or Space makes the patch from them (you can still change its counts then); the button then reads Keep Patch, and pressing it (or the key) again keeps the patch. The button is greyed out until the lines close an area.
- Grid / Rings: fill each area with a grid, its lines running straight across from the existing edges, or with rings of quads round its edge and a small grid in the middle. Rings starts with at least one ring, more for a wide area; Up / Down add or take away rings and Left / Right turn the middle. Switching remakes a live patch the other way.
- Smoothing: how much a drawn line is smoothed before it is used, from 0 (exactly as drawn) to 10. The line is smoothed as you drew it on the screen, then laid on the model under it.
- Edges along the line: how many quads run along the line you drew, for the patch not yet kept (Ctrl+mouse wheel does the same). Against existing edges with a different count, the patch steps between the two with reduction quads, three edges into one, still all quads. So there the count moves by two, and stays between a third of the existing count and three times it. Reductions have more room in a patch two or more rows deep; in a single row they are tight.
- X / Y: the counts the arrow keys change on the live patch under the cursor — X with Left / Right, Y with Up / Down. With Rings they are Turn (where the middle grid's corners sit) and Rings. Drag them to set the counts directly.
Where your line faces existing edges, its points are placed straight across from theirs rather than evenly along the line, so the quads between them do not lean even when the line is much longer than the edge it faces.
The new edges are as long as the existing edges your lines end on; with none nearby, the quads start about 40 pixels across on screen. Mirror Mode works as for every Create tool. An area is found only when all of it is on screen in the view you are drawing in.
Drawing a curve
- Click on the model to place a point. Each click adds the next point, lying on the surface. With the Pen Tool a click places a corner; with the Curvature Pen (P) the curve runs smoothly through the points.
- Press and drag away from a new point to pull out its handles and bend the curve there, as in the Stroke Tool.
- Drag a point of the curve you are drawing to move it: Shift slows it down, Ctrl keeps it to one direction, and it snaps into line with the draft's other points (Alt turns the snap off). Drag a handle's end to reshape the curve.
- Alt+click a point to switch it between smooth and corner; Alt+drag a handle to break it. The Handles buttons in the tool's settings (Strip, Rails and Loop Band) set the picked point's mode. All five pens of the bezier pen work here, including Add Anchor Point (+) and Delete Anchor Point (-).
- Backspace removes the last point (and, with none left, reopens the curve before it). Enter ends the curve. Esc drops everything drawn so far.
- An ended curve's points stay on screen (yellow) until the quads are made, and can still be moved: the point under the cursor is ringed in cyan; drag it and the preview quads follow (one undo step a drag). An end dragged onto a point of the quads you already have snaps to it, as when drawing. Alt+click switches a point between smooth and corner, and Delete Anchor Point (-) removes it (a line keeps at least two). This works in Strip, Multi-stripe and Rails; see Changing the lines for adding points, deleting a line and carrying one on.
Joining the quads you have
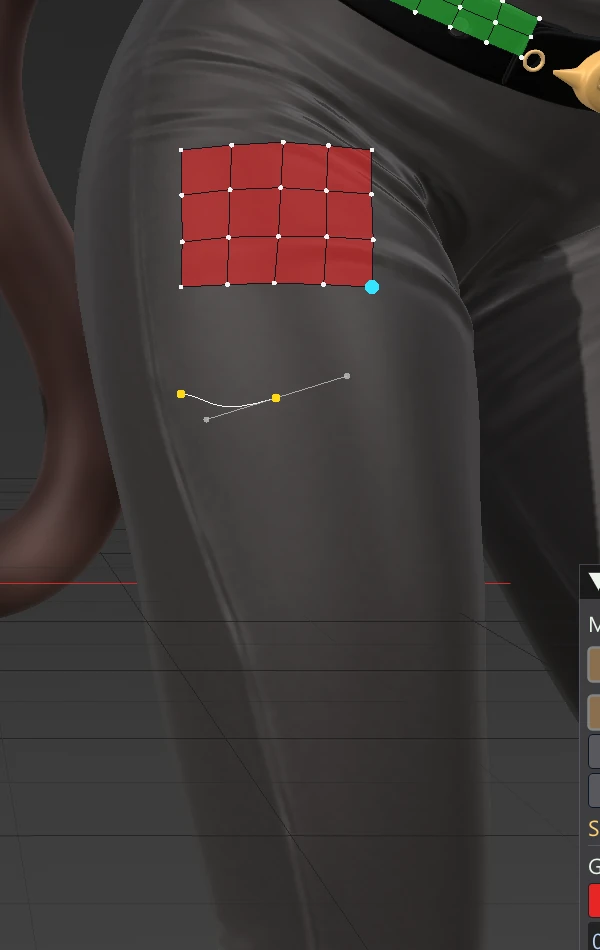
A point placed within a few pixels of an open edge of the quads you already have snaps to that edge's point (it turns cyan), and the new quads will be joined there instead of overlapping. When both ends of a side are snapped onto the same open edge, that side follows those existing edges exactly, its count is fixed to theirs, the side turns cyan, and the status line says “Locked by attached edge (n)”. The opposite side gets the same count, so the new patch continues the old edge flow.
The preview
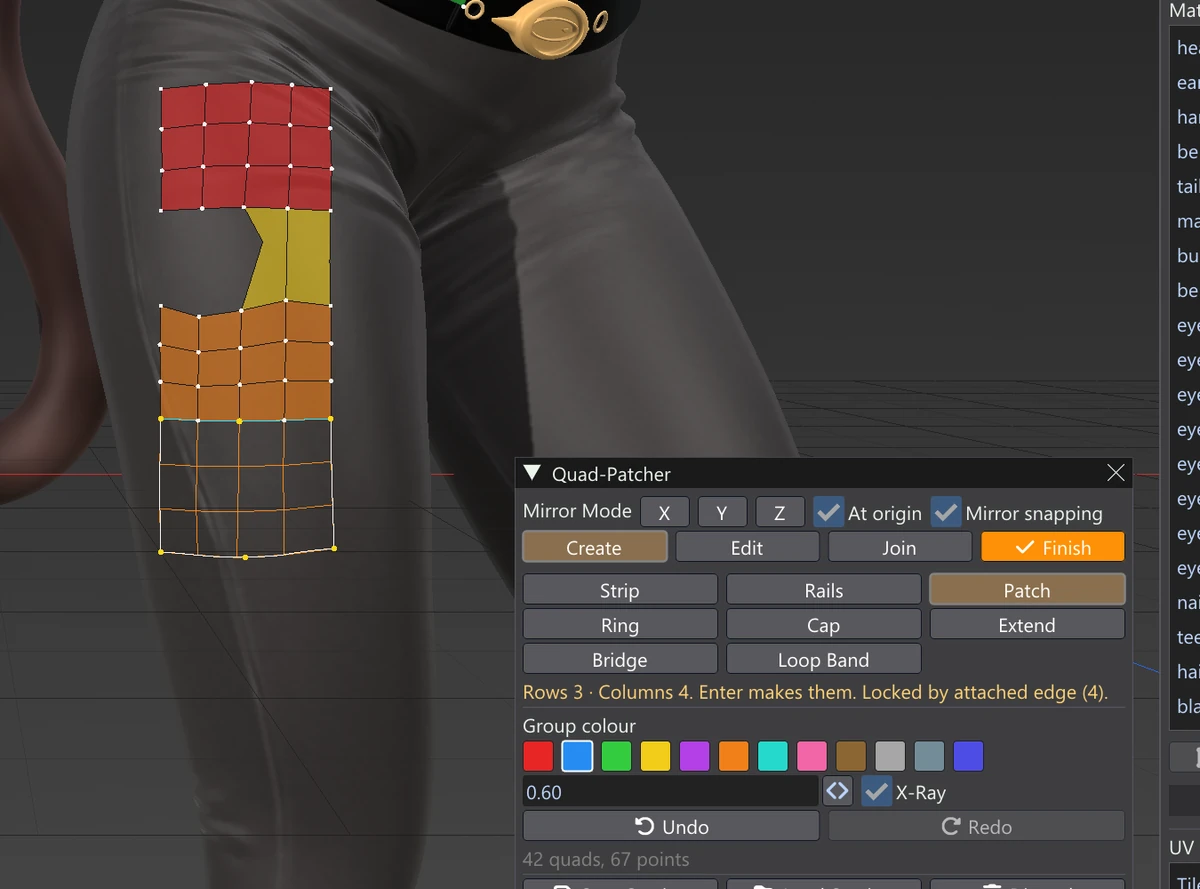
As soon as a tool has all its curves, the quads it would make are drawn as an orange wire. Change the counts with the arrow keys and the preview follows. A quad drawn red is folded over or has no area — usually a curve doubling back — and is worth fixing before you make it. With Mirror Mode on, the mirrored copies are previewed too, fainter. Enter makes the quads in the current Group colour as one undo step.
Strip
Draw two roughly parallel curves (Enter after each). The quads fill the band between them, their ends joined straight across. Left / Right set the columns along the curves, Up / Down the rows across. The second curve may be drawn either way round.
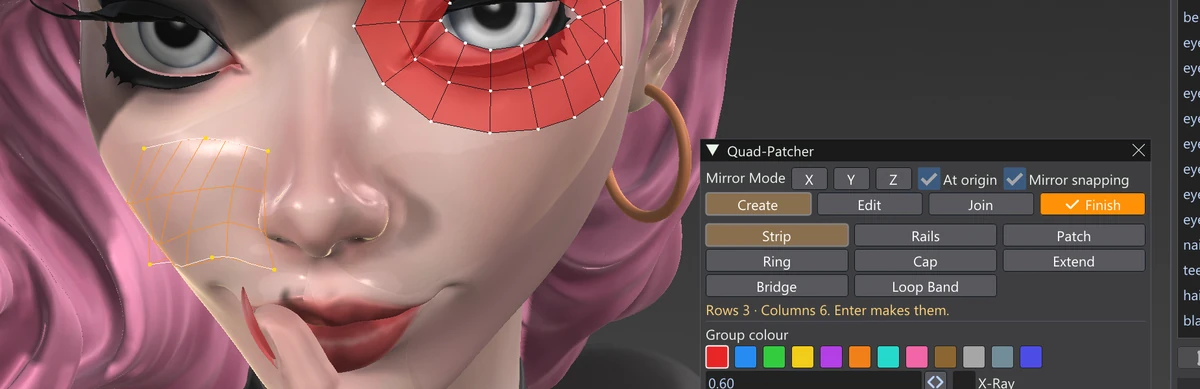
Multi-stripe
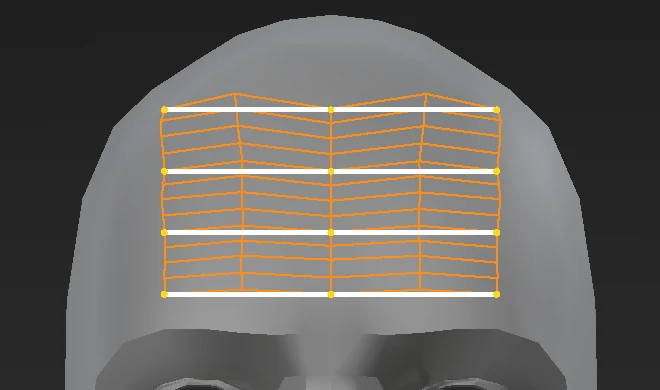
Switch on Multi-stripe in Strip's tool settings to draw as many lines as you like, side by side, for example four lines down the side of an animal. Every line you draw becomes an edge loop, and the quads fill the band between each line and the next. The bands come out joined into one piece.
- Press Enter after each line. When no line is being drawn, Enter makes the quads.
- Up / Down set the rows inside every band, and Left / Right the columns along all of them. One band's own rows: hold the cursor over a band (it is outlined in cyan and the status line names it) and press Up / Down; only that band changes.
- Each line may be drawn either way round. It is turned to run the same way as the line before it.
- A line attached to existing quads fixes the number of columns, as with two lines. All attached lines must have the same number of edges.
- With Multi-stripe off, Strip takes two lines, as before.
Changing the lines
Until the quads are made, the lines you have ended can still be changed (Strip, Multi-stripe and Rails):
- Move a point: drag any point of a line; the quads follow.
- Add a point: hold the cursor over a line (it lights up cyan) and click on it: a new point goes there, ready to drag.
- Delete a line: hold the cursor over it and press Delete. The next line you draw takes its place, so a line in the middle of a Multi-stripe can be redrawn without starting over.
- Carry a line on: click one of its END points without dragging. The line is drawn again from there: click more points, and Enter ends it and puts it back in its place.
Strip settings
- Smoothing (0 to 10): evens out the quads between the lines. The lines themselves stay where they are, so in Multi-stripe every line is still an edge loop.
- Columns at points: a column of quads goes through every point you placed on a line, so the line's bends are kept (otherwise the columns are spaced evenly and can cut across a bend). The other columns are spread evenly between the points. Columns must be at least the points on a line less one; if they are too few, the status line says how many points were left out.
Rails
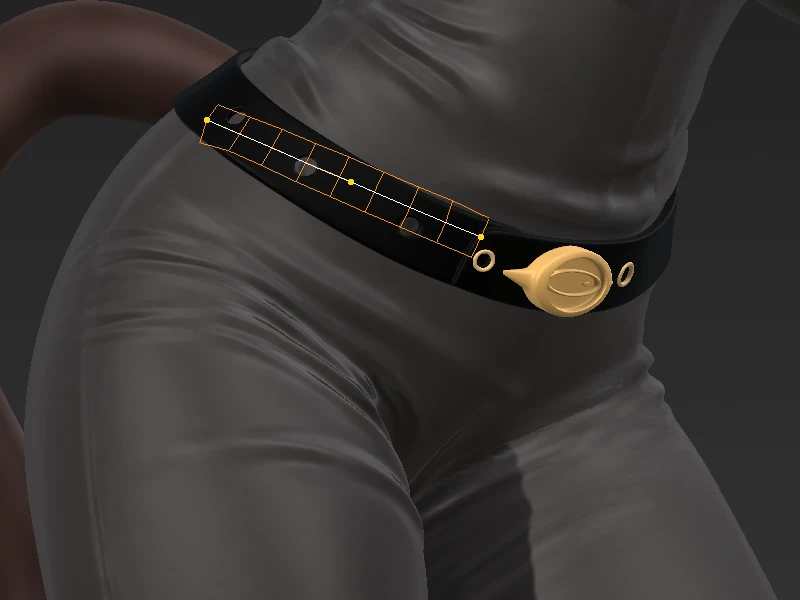
Draw one curve: the centre line of a band of quads, such as a belt, a strap or a seam line. Left / Right set the quads along it, Up / Down the rows across, and Shift+Up / Down the band's width. It starts at 1 row across and 8 columns along — a row of quads with the line down its middle — and a width that follows the grid: a tenth of the main grid spacing, so 0.005 with a 5 cm grid and 0.5 with a 5 m one. The settings show it as Width: … (grid); drag the slider to set your own, and Defaults goes back to the grid's.
Rails works like the Loop Band, but the line stays open:
- Click points along the centre line. Click and drag to place a smooth point and pull its handles out. The rail appears from the second point.
- Drag a point or a handle to fine-tune the path. The rail follows as you drag.
- Each new click adds a point at the end of the line. Click a point to pick it, and press Delete to take it away.
- Press Enter to make the rail. There is no separate step to end the line.
Loop Band
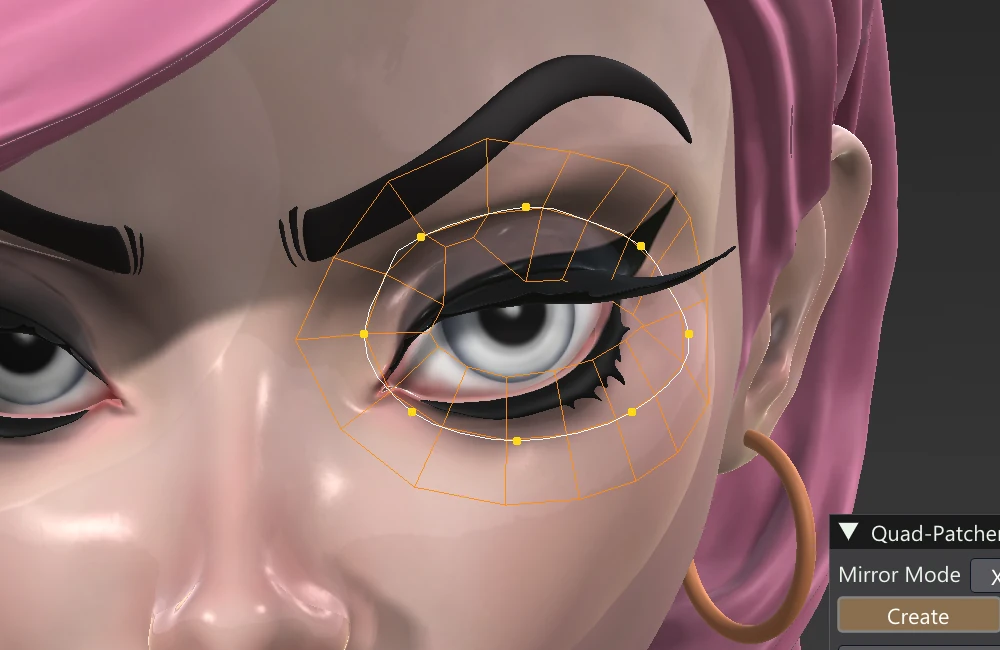
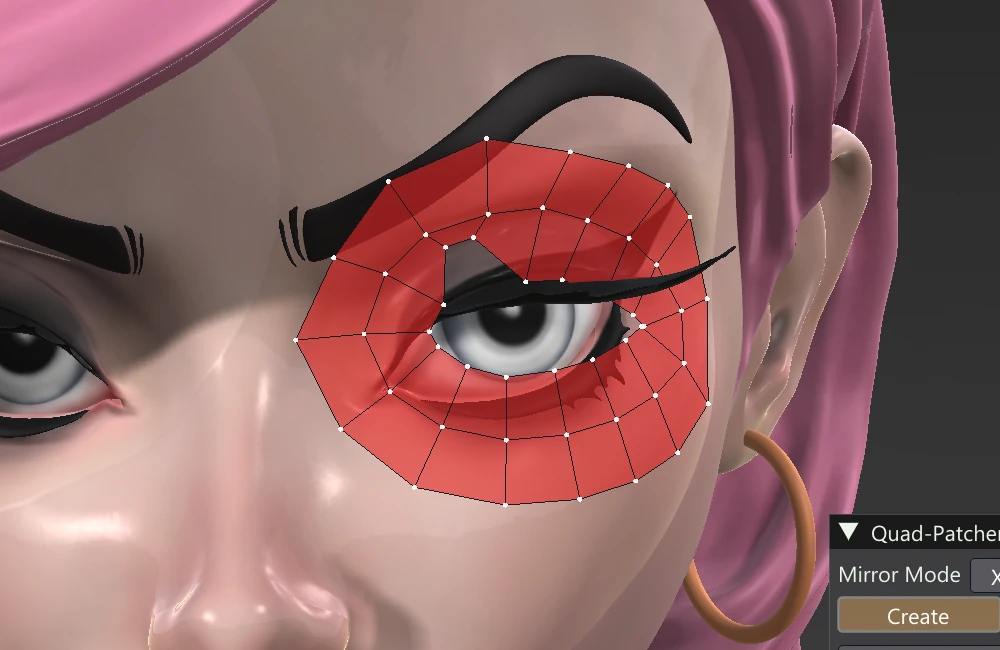
A closed band of quads round a loop you draw — the rings of quads round an eye or a mouth. Click points round the loop: from the third point on it is always closed back to the first, so you shape the whole loop as you go (drag points to move them, Backspace takes the last one away). The band runs along the loop with the loop down its middle and follows the model's surface closely on both sides.
When the loop has all the points it needs, right click (a click, not a drag — a right drag still turns the view). No more points are added at the end after that: click on the line to put a new point there, click a point to pick it (it turns white) and drag it, or press Delete to take the picked point away. A loop keeps at least three points.
- Left / Right: the quads round the loop. It starts at 16 round and 2 across, small quads sized to the loop.
- Up / Down: the rows across. With two rows the drawn loop is the middle edge loop.
- Shift+Up / Down: the band's width, as with Rails. Until you set it, the width keeps the quads roughly square as the loop changes.
- Enter makes the band.
Edge Quad
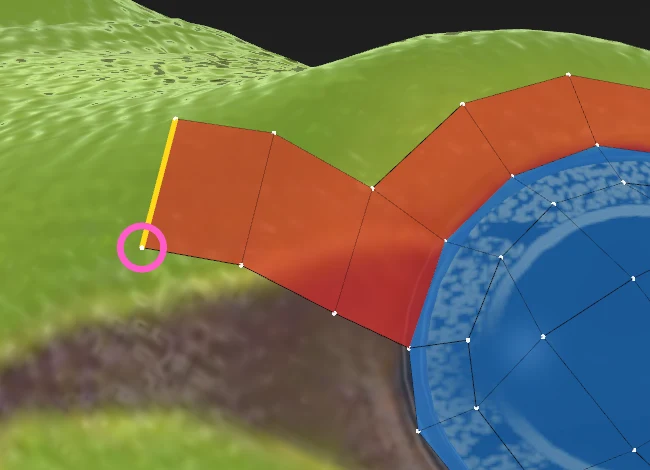
One quad at a time, from an edge you already have. Click any edge of the quads (it turns thick yellow), then two corners: each is either a point of the quads (it rings cyan under the mouse) or anywhere on the model, which makes a new point there. The second corner makes the quad.
- The first corner joins the end of the edge marked with a pink circle: the end that touches more quads (an end on three quads before one on two). When both ends touch as many, it is the end nearer where you click — the circle follows the mouse until then. The second corner joins the other end.
- After the quad is made, its far edge — between your two corners — is picked, so two more clicks lay the next quad on. A strip goes down quad by quad.
- Esc starts again; Ctrl+Z takes back a quad, or the last pick. Mirror Mode makes the mirrored quad too.
Patch
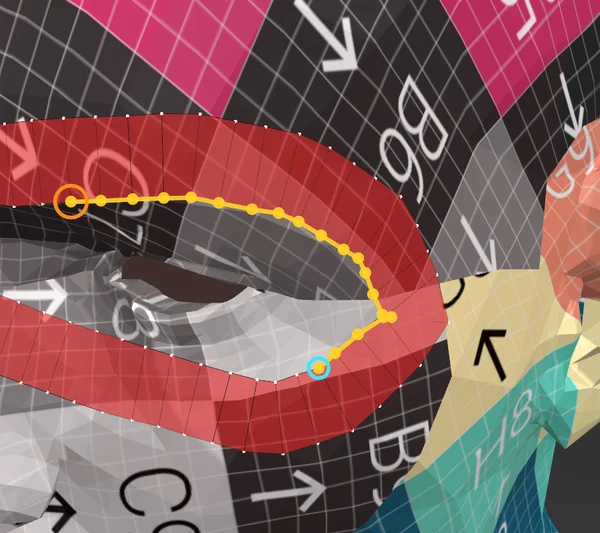
Fills an area whose edge you pick from the points of the quads you already have. Click the points one after another round the area. Each click is one point of the patch's edge, with one quad edge between each two, so the patch has exactly as many points round it as you clicked. Only points of the quads can be picked; a click on the bare model does nothing. Points are picked where they are drawn, just above the model.
- Click the first point again, or press Enter, to close the loop and fill it. It needs at least four points, and an even number of them: the status line says when to pick one more.
- Backspace takes the last point back; Esc drops them all.
The fill is live until you keep it:
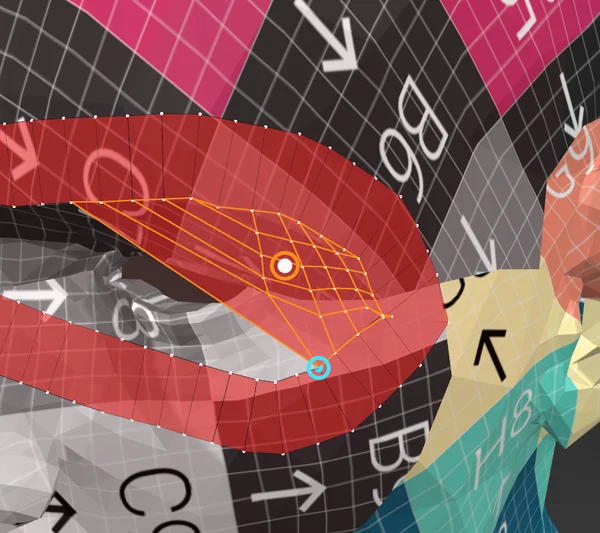
- Grid or Rings (in Patch settings): a grid across the area, or rings of quads round its edge with a small grid in the middle. In Rings, Up / Down (or Ctrl + wheel) or the Rings slider set how many rings there are.
- Left / Right turn the grid round the loop.
- The middle: drag the white dot in the middle of the patch to move where the rings close in, or where the grid's middle sits.
- Smoothing (in Patch settings): 0 lets the inside follow the sides; higher values spread the quads out more evenly.
- Return or Space keeps it. Clicking a point outside it keeps it too, and starts the next patch. Esc takes the fill away and gives you its points back, to change before filling again.
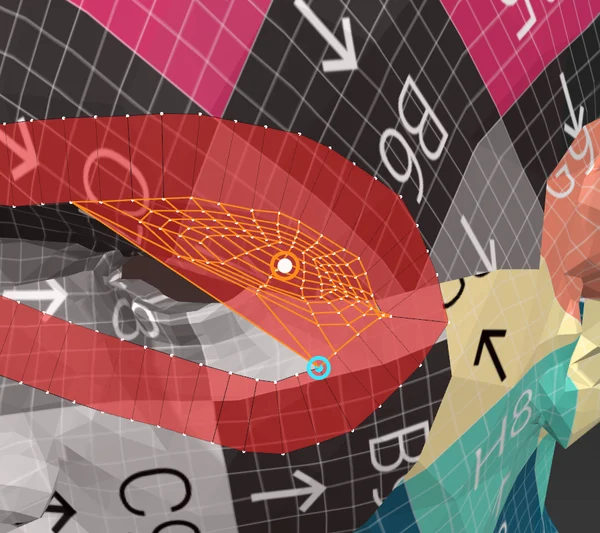
Guided Fill
Fills an area with a clean, regular layout of quads: draw an outline round it, or click the open loop round a hole in the quads you already have. Choose how in the tool's settings:
- Outline — Bezier, Circle or Freehand (below).
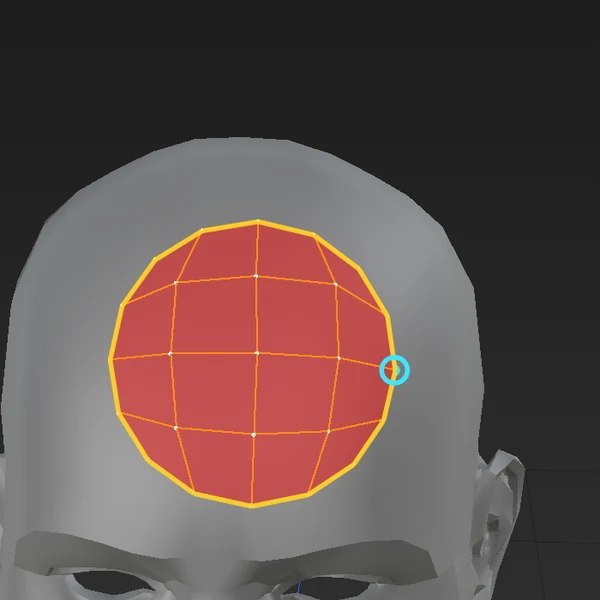
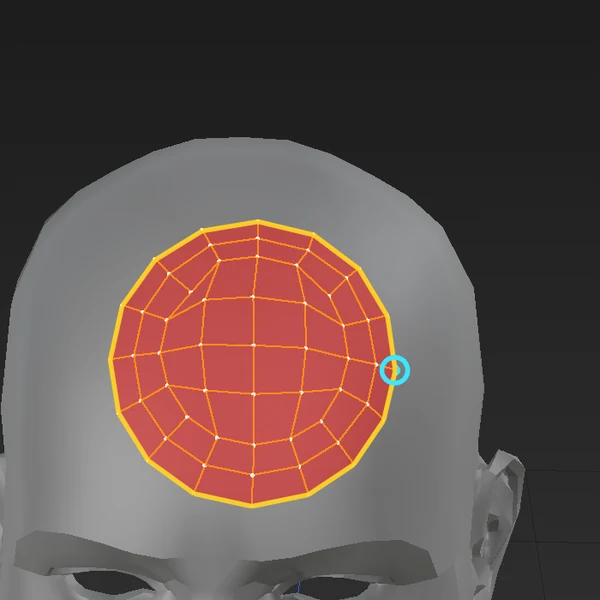
- Fill — Grid: one grid across the area, its four sides cut from the outline; or Rings: rings of quads round the outline and a small grid in the middle.
- Edges round — how many points a drawn outline gets (auto: about 40 pixels apart, as drawn). Rings — how many rings (auto: one for every eight points round).
The fill is joined to every point of its outline, so it meets the quads round it exactly. It stays live until you keep it:
- Up / Down (or Ctrl + wheel) change Edges round with Grid, or the rings with Rings; Left / Right turn the grid (or the middle) one point round. Each change makes the fill again; Shift steps five.
- Return or Space keeps it; Esc takes it away (Ctrl+Z brings it back). Dragging a point of it keeps it too.
- An outline always gets an even number of points — a closed run of quads has one.
Circle and Freehand
Circle: press where the middle should be and drag out the radius; let go and the circle is filled. Freehand: drag an outline round the area and back to where you started (it shows in yellow, with a faint line back to the start). With either, a plain click — no drag — picks a hole's loop instead. While a fill is live, an outline started off it keeps that fill and begins the next.
Bezier
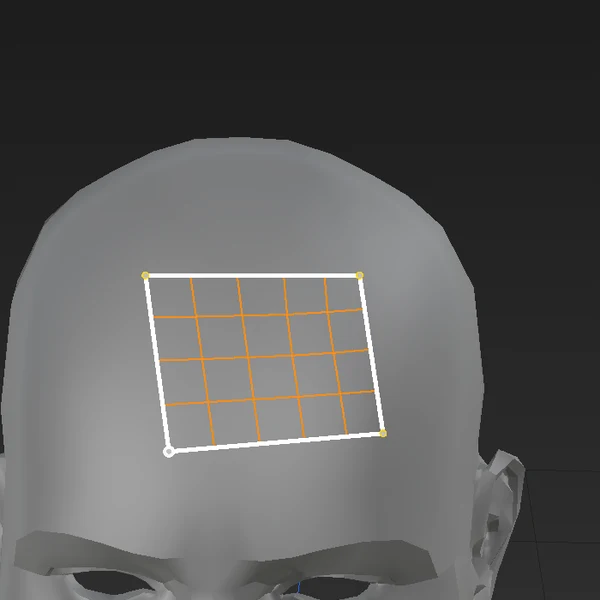
Click points round the area and drag their handles, as with the bezier pen of the curve tools (the Handles buttons appear in the tool's settings). The outline closes by itself from the third point, and its fill shows as you shape it — drag points and handles, click the line to add a point, pick a point and press Delete to take it away. Return makes the fill.
- The points you click are kept as points of the fill. Four of them make a grid with its corners exactly on yours; the sides between are cut evenly, and opposite sides get the same count.
- The outline lies on the model exactly under the line you see.
Filling a hole
Click the open loop round a hole (the edge of the quads you already have, as for Cap). The hole keeps its own points — Edges round is for drawn outlines — and the fill meets each of them.
- A hole with an odd number of points cannot take a Grid or Rings; the status line says so. Split Loop one edge beside it, or use Cap.
- Clicking the outside edge of the quads is refused — that would fill over them.
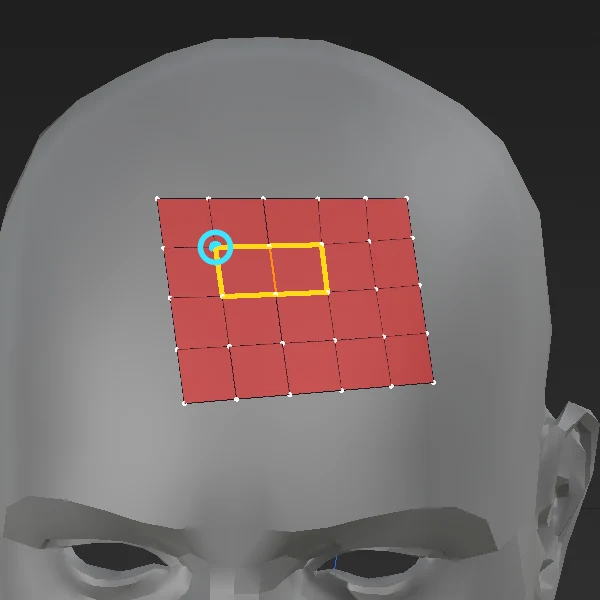
Outlines along existing quads
Where an outline runs along the edge of quads you already have, it follows them point for point, so the fill joins them exactly. You do not have to trace precisely: within a few pixels of their edge is enough.
- An outline is refused, with a note on the status line, when it does not come back to its start, when most of it is off the model, when it runs over an edge onto a surface behind, or when it crosses itself.
- A shape drawn over quads that are already there is cut in (below).
- The fill follows the model's shape straight under the outline, so a circle round a dip or a bump stays an even grid.
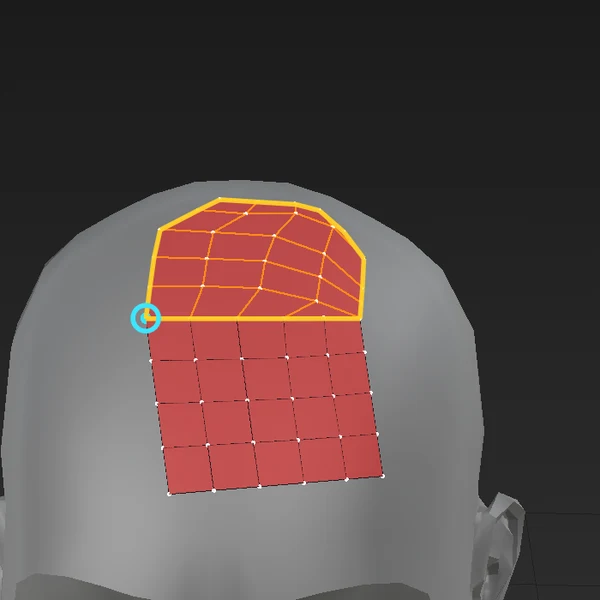
Cutting a shape into existing quads
Draw a shape over quads you already have — a circle where an eye or a nostril should go, say — and Guided Fill cuts it in: the quads the shape covers or crosses are taken out, the shape is filled (Grid or Rings), and one row of quads joins its edge to the edge of the hole, meeting every point of the quads round it. Where the two have different numbers of points the row takes three edges into one in a few places; an odd difference is closed with one triangle.
- Circle and Freehand cut in when you let go. A Bezier shape shows its fill as you draw it and cuts in on Return.
- It is live, as any fill: Up / Down change the counts, Return or Space keeps it, and Esc puts the quads it cut back.
- Whole quads are taken out, so the hole is a little bigger than the shape, its edge following theirs.
- The shape has to lie inside the quads: one that reaches their outside edge is refused.
- With Mirror Mode on, the quads mirroring the cut ones are cut too, and the mirrored shape is filled and joined on the other side, the same as this one. When that cannot be done, the shape is cut in on this side only and the status line says the mirror was skipped. That happens when the shape lies across the mirror plane, or when the quads on the other side do not mirror these.
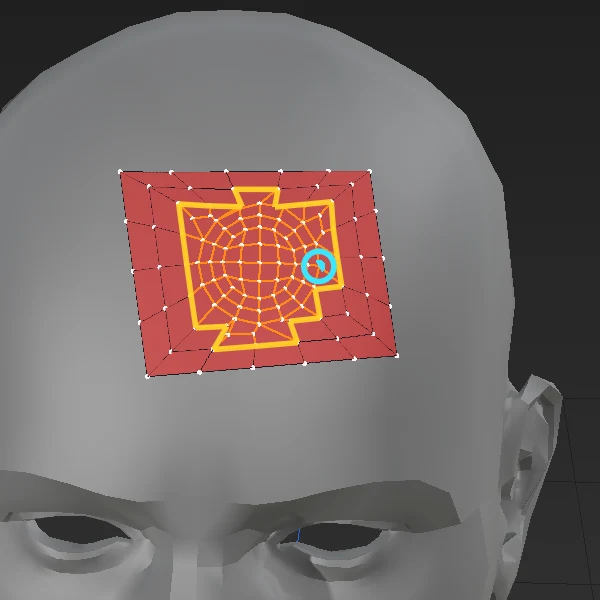
With Mirror Mode on
The fill is mirrored like any other patch. A hole or outline that crosses the mirror plane — across the middle of the model — is its own mirror image already, so it is not mirrored on that axis; the status line says “Mirror skipped”.
Guided Fill comes with the Regular and Ultra editions.