
Mesh-Aware Nodes
Most nodes work in UV space: a noise or a tile pattern does not care what shape the model is. The nodes on this page are different — they read the model itself: how its surface bends, how enclosed each point is, which way it faces and how high it sits. That is what lets a graph put wear on the edges, dirt in the crevices and snow on top without you painting a mask. In the Node Editor, right-click the canvas and open Add Node → Mesh, or type into the add-node search: it matches words such as “edge wear”, “dirt”, “snow” or “height mask” as well as the node names.
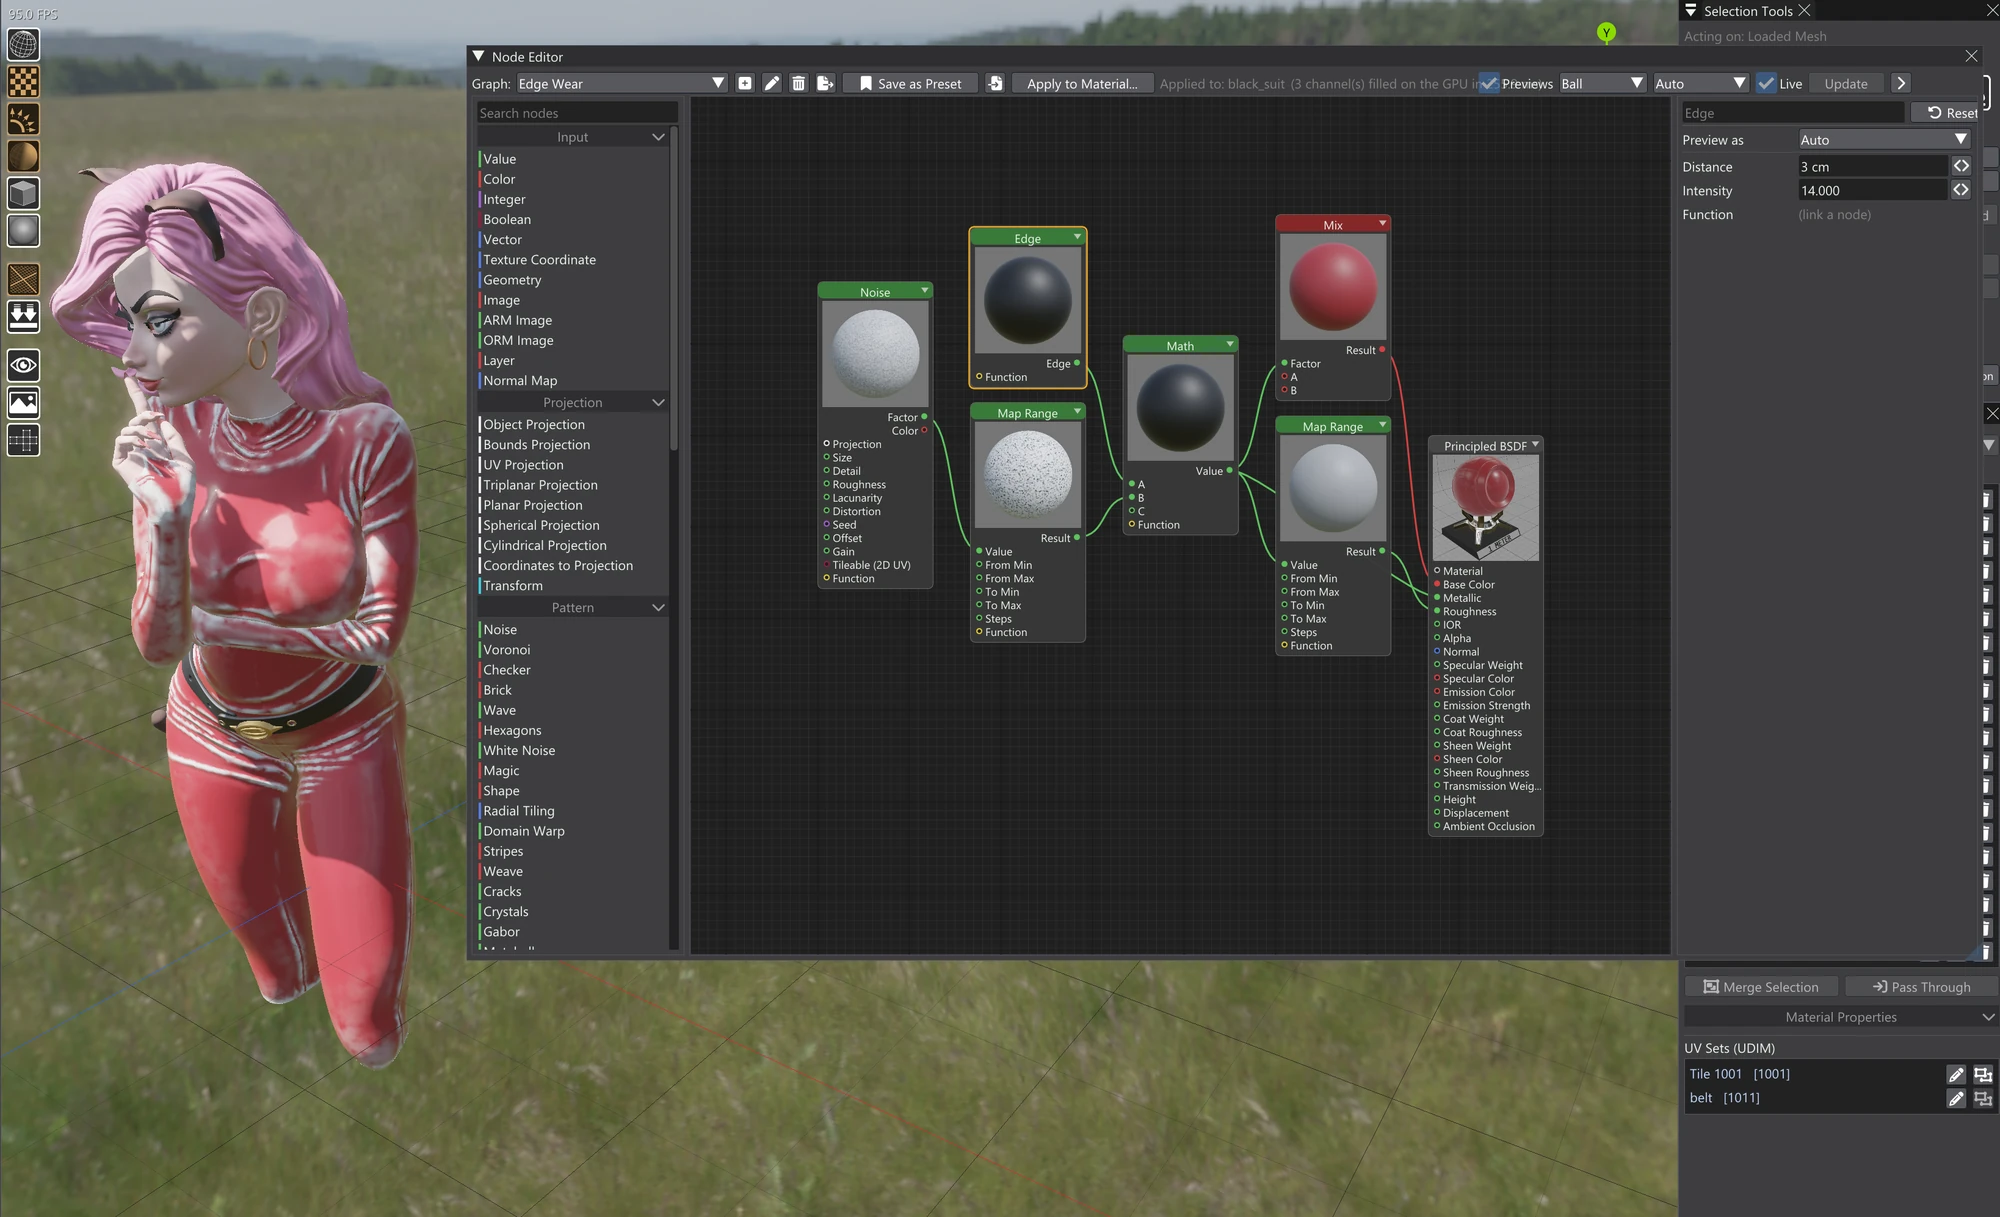
At a glance
| Node | Category | What it gives you | Typical use |
|---|---|---|---|
| Ambient Occlusion | Mesh | Occlusion: white where the surface is open, darker where nearby geometry hides it. | Dirt and grime in crevices and corners. |
| Curvature, Cavity, Edge | Mesh | Masks of where the surface bends: either way, concave only, convex only. | Edge wear, chipped paint, dust in creases. |
| Concave, Convex | Mesh | The baked Concave and Convex maps: recessed areas, raised areas. | The same jobs as Cavity and Edge, under the names bakers use. |
| Thickness | Mesh | Thickness: white where the model is solid behind the surface, black where it is paper thin. | Translucency and subsurface masks: ears, leaves, thin cloth. |
| Density | Mesh | Density: how much of a small sphere around each point is inside the model. | Telling thin parts (low) from crevices and inside corners (high); wear and dirt that follow the mass. |
| Bent Normal | Mesh | The average direction each point can see out of, as a colour and as a vector. | Occlusion-aware lighting, directional dirt, a bent normal map for a game engine. |
| Environment Light | Mesh | A sky-and-ground lighting colour, shaded by the model's own occlusion. | A soft lit base colour, hand-painted looks, a lighting mask. |
| Object Normal, World Normal | Mesh | The surface normal as the standard normal-map colour and as a vector. | An object-space normal map; colouring by facing. |
| Position | Mesh | Where each point is on the model, as a 0 to 1 colour (XYZ) or a grey (one axis). | A position map; gradients across the whole model. |
| Vertex Color | Mesh | The mesh's vertex colours, in a texture layer. | Turning vertex paint into texture; masks painted as vertex colour. |
| ID | Mesh | A flat colour per mesh piece, material, UV island or vertex colour, and a random value per region. | An ID map for selecting parts in other tools; varying each part. |
| Opacity | Mesh | The material's own opacity under this layer. | Keeping cut-outs (leaves, lace, decals) cut out in a new channel. |
| Bevel | Mesh | The normal a rounded edge would have, for the output's Normal. | Hard-surface models: edges that catch the light without extra geometry. |
| Wireframe | Mesh | A mask along the polygon edges. | Panel lines, a stylised wire look, a mask that follows the topology. |
| Raycast | Mesh | Whether a ray in one direction hits the model, and how far. | What is sheltered from above (rain, dust, sun), what faces a wall, distance masks. |
| Flood Fill | Mesh | Per UV island: a Random value, a Random Color, and Gradient U / Gradient V across the island. | Varying planks, tiles or panels one island at a time. |
| Position Gradient | Mesh | Factor: 0 to 1 along one axis of the model's bounds. | Dirt rising from the ground, rust heavier lower down, fades by height. |
| Direction Mask | Mesh | Mask: white where the surface faces a chosen direction. | Snow, moss or dust on upward-facing surfaces. |
| Texture Coordinate | Input | Object, Generated, UV and Normal vectors. | Feeding the model's own coordinates into patterns and maths. |
| Geometry | Input | Position, Normal, Tangent, Vertex Color, Material ID. | Reading vertex colours or building your own direction maths. |
| Triplanar Projection and the other projections | Projection | Coordinates made from the model's 3D position instead of its UVs. | Seam-free patterns on models with poor or no UVs. |
How the measured nodes work
Ambient Occlusion, Curvature (with Cavity, Edge, Concave and Convex), Thickness, Density, Bent Normal, Bevel, Raycast and Environment Light measure the model by casting rays — seconds of work, far too slow to repeat every time the graph changes. So the graph never measures anything itself: Vertexix bakes each measurement once in the background, for that mesh, material and layer size, and keeps the result. Changing a colour or a blend downstream reuses the bake instantly. Vertex Color, ID and Wireframe cast no rays, but they too are made once into a map of their own and kept.
- Until a bake is in, the node gives its neutral value (open for Ambient Occlusion, Thickness and Environment Light; flat — black — for the curvature nodes; 0.5 for Density; the plain surface normal for Bent Normal; flat for Bevel; nothing hit for Raycast) and says on the node that it is measuring the mesh. The Node Layer fills in by itself when the bake lands.
- Each different Distance / Samples combination is a bake of its own. Curvature, Cavity, Edge, Concave and Convex with the same Distance and Intensity share one bake, so using several of them costs no more than one. Environment Light shares the Ambient Occlusion bake with the same Distance and Samples.
- The bake runs on the GPU where it can, falling back to the CPU when it cannot.
- The rays hit the whole mesh, not just the material you are texturing — a part tucked under another material is still occluded by it. That holds on the Generated Mesh too.
- Editing the model's geometry or switching to a new UV layout makes the old bakes stale; the next fill bakes again. A Vertex Color map is made again when the vertex colours change.
- These nodes work on a Node Layer filled into a texture or into the vertex layers (measured at each vertex then — except Flood Fill, Wireframe and ID by UV Island, which give their neutral value there: vertices have no UV islands, and every vertex lies on an edge). Node previews read the neutral value.
Ambient Occlusion
How much of the sky each point can see. Open surfaces are white; the insides of crevices, corners and gaps between parts go dark. Run it through a Map Range or Color Ramp and use it as the mask for dirt, grime or darker, rougher material.
| Setting | Default | What it does |
|---|---|---|
| Distance (m) | 0.5 | How far each ray looks for something blocking it, in metres. Short distances pick out only tight crevices; long ones darken whole recessed areas. |
| Samples | 32 | Rays per texel. More is smoother and slower to bake. |
Curvature, Cavity, Edge, Concave and Convex
How the surface bends around each point. Rays probe a small disc around the point; if the surroundings rise above it the point is in a crease (concave), if they fall away it is on an edge (convex). Open mesh borders count as strong edges. Five nodes read the one measurement, each giving one mask:
| Node | What it shows |
|---|---|
| Curvature | White wherever the surface bends either way, black where it is flat. |
| Cavity | White in creases and crevices only. |
| Edge | White on convex edges only — the classic edge-wear mask. |
| Concave | The baked Concave map: recessed areas white, everything else black. The same mask as Cavity. |
| Convex | The baked Convex map: raised areas white, everything else black. The same mask as Edge. |
Concave and Convex are there under the names baking tools give these maps, so a graph built from a baker's map list finds them. Each of the five has the same settings:
| Setting | Default | What it does |
|---|---|---|
| Distance (m) | 0.05 | The radius of the probe, in metres. Small values catch fine bevels and panel lines; larger ones respond to broad shapes. |
| Intensity | 4 | Contrast. Raise it to make gentle bends read as strong edges. |
A raw Edge mask looks too clean. Multiply it by a noise remapped to a narrow range so the wear breaks up, and combine it with a few scattered chips.
Thickness
Ambient occlusion turned inward: rays go into the model instead of out of it. The result is white where the model is at least Distance thick behind the surface and black where it is paper thin — a ready-made mask for translucency, subsurface scattering, or light bleeding through thin parts.
| Setting | Default | What it does |
|---|---|---|
| Distance (m) | 0.1 | The thickness, in metres, that counts as fully solid. |
| Samples | 32 | Rays per texel. More is smoother and slower to bake. |
Density
How much of the model is around each point: picture a sphere of radius Distance centred on the surface and ask what share of it lies inside the model. On a flat face of a solid block half the sphere is inside, so Density reads about 0.5. It drops on thin parts — a plate thinner than the sphere fills less of its lower half — and rises in crevices and inside corners, where material wraps round the point. Thickness only looks straight behind the surface; Density looks in every direction, so it also sees material beside the point.
| Setting | Default | What it does |
|---|---|---|
| Distance (m) | 0.1 | The radius of the probe sphere, in metres. |
| Samples | 32 | Rays per texel. More is smoother and slower to bake. |
The model should be closed for Density to mean much: inside and outside are told apart by counting how often each ray crosses the surface, and a hole lets a ray out without crossing anything.
Bent Normal
The average direction each point can see out of. On an open surface it is the ordinary normal; next to a wall or down in a crease it leans away from what blocks the view, toward the open side. Game engines use a bent normal map for occlusion-aware lighting, and in a graph it makes a good direction for dirt and light that should follow the openings rather than the faces.
| Output | What it gives |
|---|---|
| Color | The bent normal as the standard normal-map colour (see Object Normal), ready to wire into a channel and export as a map. |
| Normal | The bent normal as a vector, for maths and for Direction Mask. |
| Setting | Default | What it does |
|---|---|---|
| Distance (m) | 0.5 | How far each ray looks for something blocking it, as in Ambient Occlusion. |
| Samples | 32 | Rays per texel. More is smoother and slower to bake. |
The map is in object space. There is no tangent-space version.
Environment Light
The model lit by a simple sky: a Sky colour from above, a Ground colour from below, blended by which way each point faces, then darkened in the crevices by the model's own ambient occlusion. The result is a soft, believable lighting colour — a base for hand-painted looks, or a mask for anything that should follow the light.
| Input / setting | Default | What it does |
|---|---|---|
| Sky | Light blue | The colour of light from above. |
| Ground | Dark brown | The colour of light from below. |
| Intensity | 1 | Brightness of the whole result. |
| Contrast | 1 | How sharply the sky and ground colours separate. Higher values give a harder line at the horizon; 0 gives one even mix everywhere. |
| Occlusion | 0.6 | How much the ambient occlusion darkens the result: 0 ignores it, 1 applies it fully. |
| Up Axis | Y+ | Which way is up: X, Y or Z, either sign. |
| Distance (m), Samples | 0.5, 32 | The ambient occlusion's settings, as on the Ambient Occlusion node. With the same values the two nodes share one bake. |
Sky, Ground, Intensity, Contrast and Occlusion are inputs, so a texture or a mask can drive them.
Object Normal and World Normal
The surface normal, given two ways. Color is the standard normal-map colour — each axis mapped from −1..1 to 0..1, so a surface facing straight along +Z is (128, 128, 255) — and it is stored that way when you wire it into a colour channel such as Base Color, ready to export as an object-space normal map. Normal is the plain vector, for maths.
In Vertexix the two nodes give the same result: a model is never rotated into a scene (resting it on the ground only lifts it), so its own space is world space. Both are there so a graph says which map it means and keeps meaning it if that ever changes.
Position
Where each point is on the model, scaled to 0..1 — the position map bakers make. With Axis set to XYZ, Color holds X, Y and Z as red, green and blue; with a single axis it is a grey ramp along that axis. Value is the same as a number (the average of the three for XYZ).
| Setting | Default | What it does |
|---|---|---|
| Axis | XYZ | XYZ, X, Y or Z. |
| Normalization | Bounding Box | What 0 and 1 mean. Bounding Box: the two sides of the model's bounds on each axis. Bounding Sphere: the sphere round those bounds, its centre 0.5, so the axes keep their proportions. Object Origin: the model's origin is 0.5, and 0 and 1 are as far from it as the model reaches. |
Vertex Color
The mesh's vertex colours, read into a texture layer: each texel takes the colour at the nearest point on the mesh the layer is on, blended across the triangle there. Color is the colour, Alpha its alpha. Where the mesh has no vertex colours it is white. Use it to turn vertex paint into a texture, or to use colours painted on the vertices as masks.
ID
An ID map: every region of the model gets one flat colour, so other tools can select a part by clicking its colour. Color is the region's colour and Random a value from 0 to 1 that differs per region, for varying each part with a Color Ramp or a Map Range.
| Setting | Default | What it does |
|---|---|---|
| Source | Mesh Piece | What a region is. Mesh Piece: each separate connected part of the mesh. Material: each material. UV Island: each UV island (as Flood Fill's Random Color). Vertex Color: the vertex colours themselves (Random is then their brightness). |
Opacity
The material's own opacity under this layer: the lower of its Alpha channel and its Base Color's alpha (glTF models keep cut-outs there). Where neither has anything painted it is 1. Wire it into the Alpha channel of a new material, or multiply a mask by it, to keep leaves, lace and decals cut out. It needs no bake.
Bevel
Rounded-looking edges without rounded geometry: at each point, the normal the surface would have if its edges were rounded over Radius. Away from edges it is the plain surface; at a hard 90° edge it turns halfway between the two faces, so the edge catches the light like a real bevel. It works exactly as Blender's Bevel node: rays fired through a disc around the point pick up the normals of the surfaces they meet, nearer ones counting more.
The result is a tangent-space normal — what the output's Normal takes — on Normal, and the same as a normal-map colour on Color (to look at, or to export as a map). A normal wired into its own Normal input, a Bump for example, gets the bevel added, so a bumpy surface keeps its bumps and gains rounded edges.
| Setting | Default | What it does |
|---|---|---|
| Radius (m) | 5 cm | How far the rounding reaches from each edge, in metres. |
| Samples | 16 | Rays per texel. More is smoother and slower to bake. |
Bevel shows best on a model with hard edges — faces that do not share normals across the edge. On a model already smoothed across its edges there is less for it to round.
Wireframe
1 along the mesh's edges, 0 between them. Unlike Blender's Wireframe, which draws every triangle, it draws the polygons' edges: the diagonal that splits a quad into two triangles is left out, so a quad mesh reads as quads. On the Generated Mesh the edges are its quads, and the n-gons the Quad-Patcher's Join made.
| Setting | Default | What it does |
|---|---|---|
| Size In | Metres | Whether the wire's width is set in Metres on the model or in Texels of the layer (Blender's Pixel Size). |
| Size (m) | 5 mm | The wire's width on the model, with Size In set to Metres. |
| Size in Texels | 2 | The wire's width in texels, with Size In set to Texels — the same thickness everywhere in the texture, however the UVs are scaled. |
Its edges are smoothed over one texel. It works on texture layers only: on vertex layers every vertex lies on an edge.
Raycast
From each point, a ray in one direction: Is Hit is 1 where the ray meets the model within Length, 0 where it gets away; Hit Distance is how far it went, in metres (Length when it hit nothing), as in Blender's Raycast node. A ray never hits the face it leaves: one sent into the surface passes through the solid and meets its far side.
Pointed up, it tells you what is sheltered from above — where rain, dust or sunlight does not reach. Give it a Spread and it sends a cone of rays instead of one, and Is Hit becomes the share that hit: a soft shadow rather than a hard one.
| Setting | Default | What it does |
|---|---|---|
| Direction | Up | Up, Down, X+, X−, Z+, Z−, Along Normal (straight out of each point) or Custom (the X, Y and Z below). |
| X, Y, Z | 0, 1, 0 | The direction when Direction is Custom. |
| Length (m) | 1 m | How far the ray looks. |
| Spread | 0 | The cone's half-angle in degrees. 0 is a single ray. |
| Samples | 16 | Rays in the cone, when Spread is above 0. |
Blender's Raycast also gives Self Hit, Hit Position and Hit Normal; here the model is the only object, so Self Hit is Is Hit, and the other two are left out.
Flood Fill
Treats each UV island as one piece. Every island gets its own Random value and Random Color, plus Gradient U and Gradient V, which run 0 to 1 across that island's UV bounds. Use it to give each plank, tile or panel a slightly different tint or roughness, or a gradient that restarts on every piece. It has no settings. It is cheap and never waits for a bake, but it needs UVs — on a mesh without them it stays black.
Position Gradient
A smooth ramp along one axis of the model's bounding box: 0 below Start, rising to 1 at End. It needs no bake.
| Setting | Default | What it does |
|---|---|---|
| Axis | Y | The axis the ramp runs along: X, Y or Z. |
| Start | 0.4 | Where the ramp leaves 0, as a fraction of the model's size along the axis (0 = the bottom of the bounds, 1 = the top). |
| End | 0.8 | Where it reaches 1, as a fraction too. Set Start above End to turn the ramp upside down — heavier at the bottom. |
Start and End are inputs, so you can wire a value or a noise into them to make the boundary uneven.
Direction Mask
White where the surface faces a chosen direction. With the default straight-up direction it catches tops of things — where snow settles, moss grows and dust collects. It needs no bake.
| Setting | Default | What it does |
|---|---|---|
| Direction | 0, 1, 0 (up) | The direction to test against. |
| Threshold | 0.5 | How closely the surface must face Direction, as the cosine of the angle between them: 1 is only exactly facing, 0 is anything within 90°, −1 is everything. |
| Softness | 0.2 | How wide the blend is either side of the threshold. Low values give a hard line. |
The Function input
The Mesh nodes that give a mask — Ambient Occlusion, the curvature nodes, Thickness, Density, Flood Fill, Wireframe, Raycast (on Is Hit), Position Gradient and Direction Mask — have a yellow Function input. A function wired into it reshapes the node's own result before it leaves the node — a quick way to sharpen or invert a mask without adding a separate node after it. On Flood Fill it applies to the value outputs, not to Random Color. The nodes that give colours and vectors have none.
Geometry inputs
Two nodes in the Input category hand the model's own data to the graph. Normals are the model's own (object space), and positions are in metres.
| Node and output | What it gives |
|---|---|
| Texture Coordinate → Object | The point's position on the model. |
| Texture Coordinate → Generated | The position as 0 to 1 across the model's bounding box on each axis. |
| Texture Coordinate → UV | The UV coordinates. |
| Texture Coordinate → Normal | The surface normal. |
| Geometry → Position, Normal, Tangent | The point's position, normal and tangent. |
| Geometry → Vertex Color | The model's vertex colours (white if it has none). |
| Geometry → Material ID | Which material the point belongs to. |
Projections from the model
The Image node and many Pattern nodes take a Projection input that decides where their coordinates come from. Besides UV Projection, several projections are built from the model's 3D position, so they ignore seams and stretching in the UVs entirely:
| Node | What it does |
|---|---|
| Triplanar Projection | Projects from three sides (X, Y and Z) and blends them by the surface normal. Blend Sharpness (default 4): higher gives harder seams between the three sides. |
| Object Projection | The model's own position. |
| Bounds Projection | The position fitted 0 to 1 to the model's bounding box. |
| Planar Projection | A flat projection along one Axis (default Z). |
| Spherical Projection | Wrapped around the model's centre like a globe. |
| Cylindrical Projection | Wrapped around one Axis (default Y). |
Place any of them with a Transform node (Offset, Rotation, Scale) wired into its Transform input. A UV Projection on a mesh with no UVs falls back to triplanar rather than to nothing.
Face Normals
The Face Normals checkbox in the Node Layer window fills the layer with each polygon's flat normal instead of the smooth normal across it. Triplanar projections then give each polygon the one side it faces most, with no blending — box mapping, crisp on hard-edged models — and every Normal the graph reads (Direction Mask included) is the flat one. It is set per layer, not per graph, because the same graph on a smooth character and on a hard-edged crate wants different answers.