
Carve
Carve lifts an area of the model’s surface out as a part of its own. You outline the area on the model, and Vertexix cuts it out along a direction and to a depth you set. What it takes in becomes a separate part, and the model keeps a hole the same shape. Use it for pieces you want to print apart and press back in: inset headlights printed in another colour, an eye, a badge, a porthole, a window.
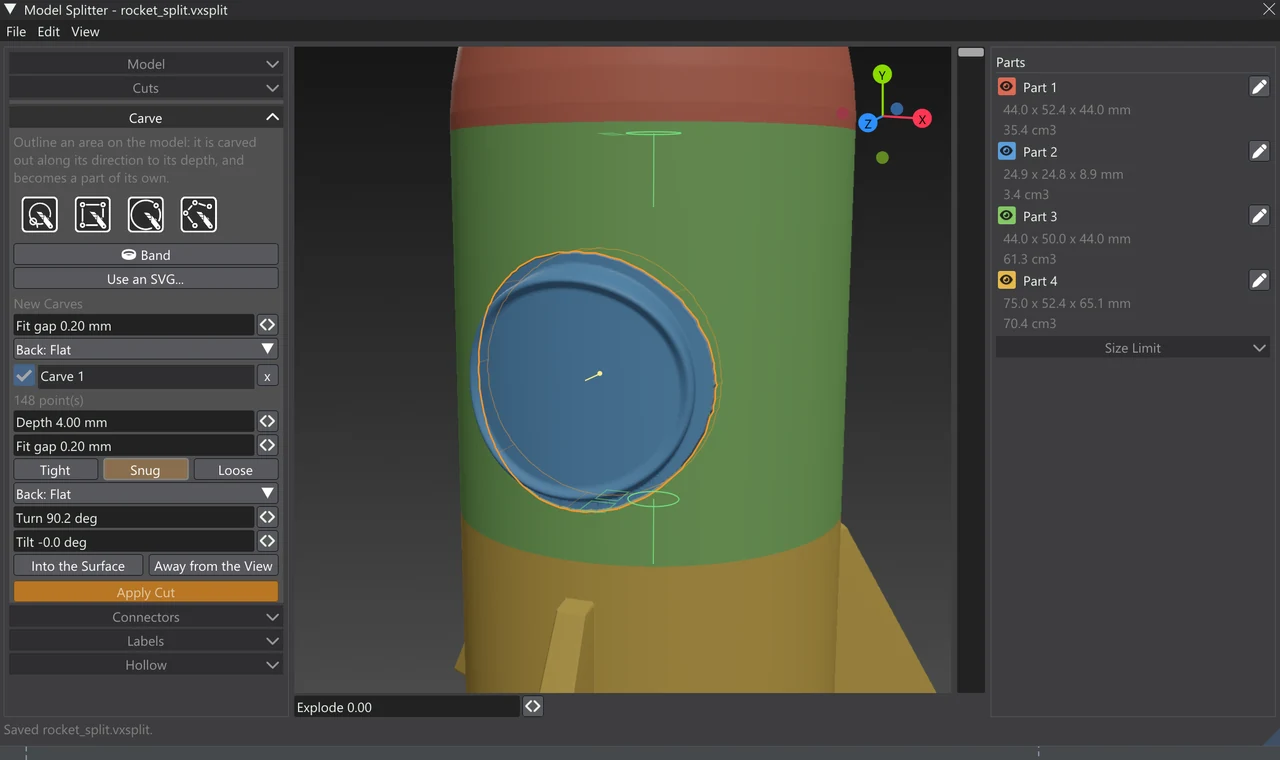
How a carve works
A carve has three things:
- An outline on the model’s surface: the edge of the piece.
- A direction: the way the piece goes into the model, and so the way it slides back out. It starts straight into the surface under the outline. The sides of the hole run along this direction.
- A depth: how far in the piece goes.
The Carve accordion sits under Cuts in the left column. Carves are cuts like any other, so they also appear in the Cuts accordion’s list with the same settings, they can be switched on and off, and they are made in the list’s order. As with every cut, nothing is carved until you press Apply Cut (or Return).
Drawing the outline
The four icons at the top of the accordion are the Cut tools’ shapes, drawn the same way:
| Tool | How to draw it |
|---|---|
| Carve Lasso | Drag round the area on the model. |
| Carve Box | Drag a rectangle over the area. Hold Alt to grow it from the centre. |
| Carve Circle | Drag out a circle over the area. Alt: from the centre. Shift: perfectly round. |
| Carve Poly | Click the corners round the area. Close the shape by clicking the first corner again or pressing Return. |
When you finish the shape, its outline is laid onto the model under it, and the carve is made at once. It goes straight into the surface there, with a depth of about half its width to start and the New Carves settings. The new carve is selected so you can adjust it, and the tool is put away. The outline has to lie on the model: draw over the surface, not off its edge.
For a clean outline, face the area first. Ctrl+right click on the model centres the view on that point and turns it to look square onto the surface there.
With a Band
The Band button in the Carve accordion draws the outline as a loop on the model, exactly as the Cuts accordion’s Band does. This is the tool to use when the area wraps round a curved surface.
- Drag to draw a loop round the area. Let go, turn the model, carry on from the loose end, and bring it back to the white anchor to close it. While the band is open, its settings say so and nothing is carved. Once closed, it is ready to carve.
- Then drag the orange line to reshape it, and the stretch either side follows up to the pins. Click to pin a point, and right-click a pin to release it. Alt-drag puts a point on the surface you see under the pointer.
- Follow Sharp Edges (with its angle) and Smoothing work as they do for the Cuts Band. Following sharp edges is useful for carving out a panel bounded by creases.
A band carve’s direction follows the surface along the band, unless you turn it yourself. Its depth starts at half its width.
An SVG as a template
To carve a logo, a star or any shape drawn in a vector program, use an SVG file as the outline.
- Press Use an SVG... and pick the file. Every closed shape it draws becomes part of the outline, and a shape inside another is a hole (so the inside of an “O” stays on the model).
- Set its Size (how wide it is laid on the model, measured on its larger side, in mm) and Turn (turns it on the model, round the surface’s normal).
- Press Place on the Model. The button reads Click on the Model... while it waits. A preview of the shape follows the mouse over the model.
- Click on the model. The shape is laid flat on the surface there, facing it and upright as you see it in the view, and the carve is made. Escape stops placing.
New Carves
Under New Carves are the settings each new carve starts with. They change nothing already made.
- Fit gap: see The fit gap. 0.2 mm to start.
- Back: Flat or Back: Follows the Surface: see The back. Flat to start.
Their starting values come from Settings > Model Splitter.
A carve’s settings
Under the list of carves are the selected carve’s settings. The list works like the cuts list: the tick box switches a carve on or off, clicking a name selects it, and x deletes it. A selected carve is drawn on the model with its outline, its back, a few lines between them and an arrow showing its direction.
| Control | What it does |
|---|---|
| Depth | With a flat back, how deep the back lies, measured past the outline’s middle. With a back that follows the surface, how far the surface is pushed back, which is the piece’s thickness. |
| Fit gap | How much smaller the piece is made, so it presses back into its hole. Tight, Snug and Loose set 0.1, 0.2 and 0.3 mm. |
| Back: Flat / Back: Follows the Surface | The shape of the piece’s back. |
| Turn / Tilt | Which way the carve goes in: the arrow on the model. |
| Into the Surface | Puts the direction back to straight into the surface under the outline, as it started. |
| Away from the View | Points the direction straight away from you, as the view looks now. |
The direction is the way the piece comes out of its hole. Straight into the surface suits most badges and eyes. On a sloping or curved front, such as a car’s headlight, look at the model from the direction you want to push the piece in from and press Away from the View. The hole’s sides then run that way, and the piece slides in from that side.
The back
- Back: Flat: the piece’s back is flat, square to the direction, at the depth past the outline’s middle. This is simple to print, and the piece sits flat on the bed. On a domed surface the piece is thicker in the middle than at its edges.
- Back: Follows the Surface: the surface inside the outline is pushed back by the depth, so the piece is an even thickness all over, like a shell. Use this for a curved panel or lens that should be the same thickness everywhere.
The fit gap
The carved piece is made smaller round its sides and its back by the fit gap, and the hole keeps its full size. That leaves room for the printer’s tolerances, so the printed piece presses back into its hole. At 0 the piece is exactly the hole’s size, which is right for a model that is only for display or that you will glue. Start with Snug and loosen it if the piece will not go in. The fit gap stays in millimetres when the model is scaled, but the depth scales with the model.
What is carved
Only the solid the outline lies on is carved. Anything else the carve would pass through on its way stays as it is, such as an arm in front of a badge on a chest. The piece goes into the model from the outline only. With Mirror on in the Cuts accordion, a carve is made again on the other side, so one headlight gives a pair.
Press Apply Cut and the piece appears in the Parts list as a part of its own. Give it its own colour there (the pencil opens Edit Part) to print it in another colour. A 3MF export keeps each part’s colour.
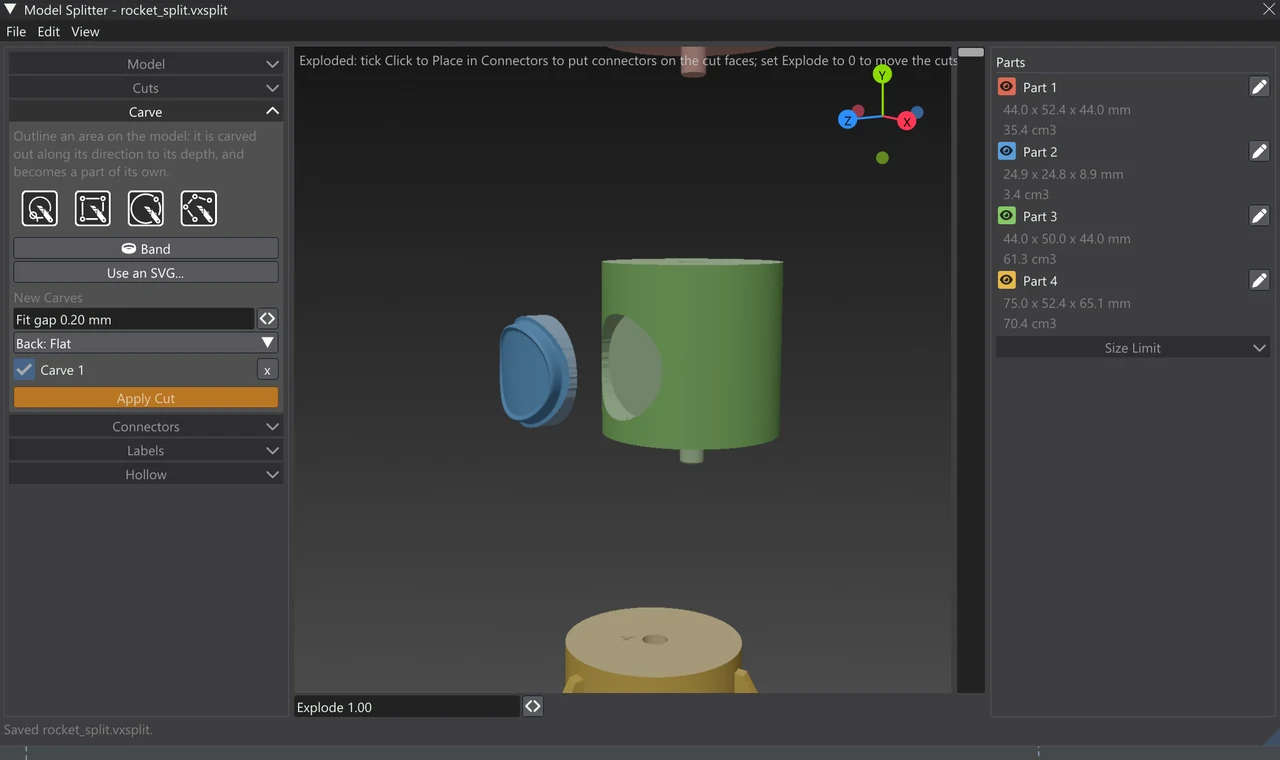
Carves in hollowed parts
If the part you carve from is hollowed (see Hollow), the carved piece is hollow too, as every piece cut from a hollowed part is. A small piece usually wants to stay solid. Pick it in the Parts list and untick Hollow This Part in the Hollow accordion.
Editions
Carve is in the Vertexix and Ultra editions. In Free and Light the accordion’s controls are greyed, with a lock badge naming the edition that has them. A working file with carves, opened in Free or Light, works out its parts without the carves.