
Hollow, Drain Holes & Thin Walls
A solid print of a big model uses a lot of material and, in resin, can crack as it cures. The Hollow accordion empties a part to a wall of the thickness you choose, bores drain holes into it so resin or powder can run out, and checks where the model’s walls are too thin to survive printing. The Cut Away slider down the right side of the view lets you look inside to see what was done.
These are modelling operations, not printer settings: the hollow and its holes become part of the solid you export, so any slicer sees them as they are.
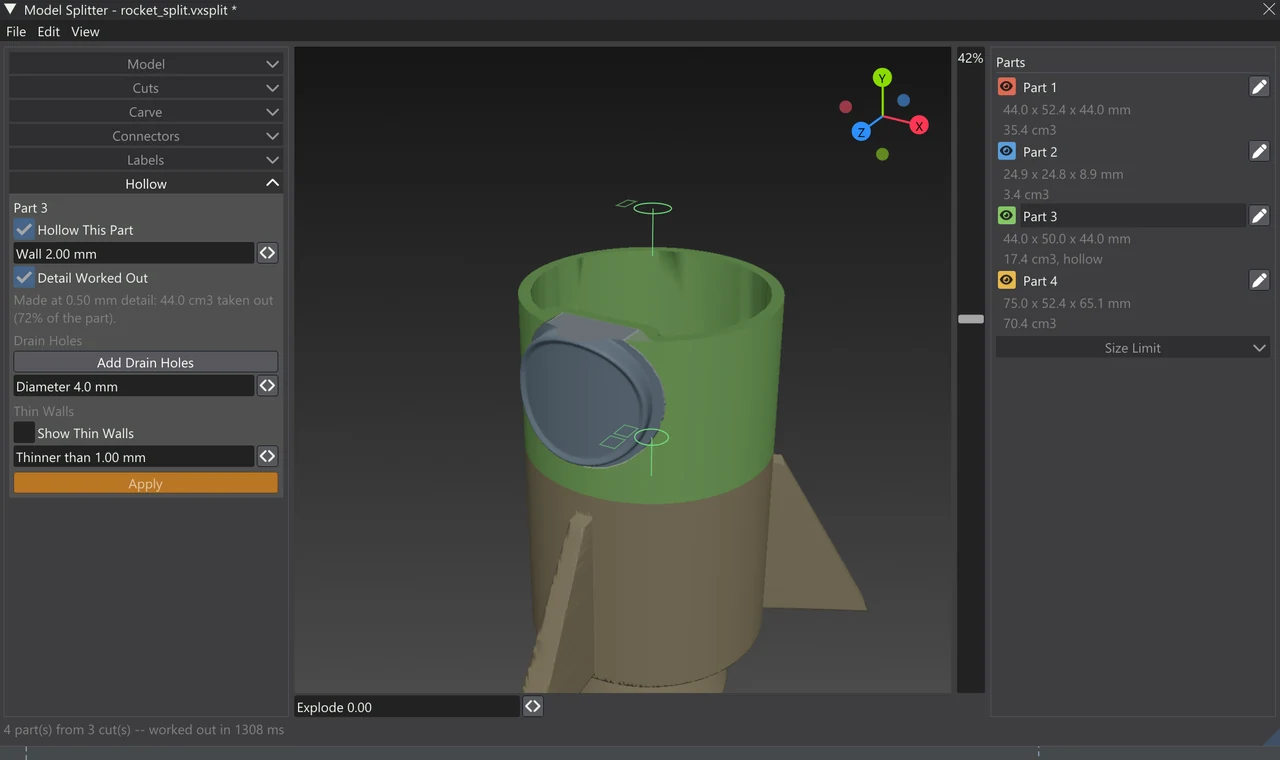
Hollowing a part
Hollowing works on one part at a time: the part picked in the Parts list on the right. With none picked, the accordion says Pick a part in the Parts list to hollow it, or to bore drain holes into it. To hollow the whole model, pick it before you cut (it is one part then) — the pieces of a hollowed part stay hollow when it is cut later.
- Pick the part in the Parts list. Its name shows at the top of the accordion.
- Tick Hollow This Part.
- Set the Wall: how thick the wall is left, everywhere in from the surface. It starts at 2 mm (Settings > Model Splitter changes that).
- Press Apply. Like a cut, a hollow waits for Apply, since a big model can take a few seconds to work out.
When it is done, a line reports what was made, for example “Made at 0.50 mm detail: 507.8 cm3 taken out (81% of the part).” The Parts list reads “hollow” after the part’s volume.
Detail
The inside is made on a grid. With Detail Worked Out ticked, the grid is a quarter of the wall (coarser on a very big model). Untick it to set the Detail yourself: finer follows the surface more closely and takes longer. The detail must stay well under the wall — if the wall is too thin for it, the splitter says so: make the wall thicker or the detail finer.
What a hollow part is
- A sealed shell. The wall runs all round, across the part’s cut faces too, so a hollowed half is a closed box, not an open bowl. Each part prints as its own closed shell, and the cut faces still meet flat.
- Sockets and engravings keep a wall. A connector’s socket and a label cut into the part are walled round, so they do not open into the hollow.
- Thin places stay solid. Where the part is thinner than two walls, there is nothing to take out and it stays solid — fingers, ears, thin fins.
- A hollow follows its part. When a later cut divides a hollowed part, every piece stays hollow. To make one piece solid, pick it and untick Hollow This Part on that piece alone; the others keep theirs.
- Dowels are never hollowed.
A peg needs solid material around it, so when you tick Hollow This Part the next connectors you place switch from Peg to Key — a lip round the cut face that fits in the wall. A notice says so; pick Peg again in Connectors to change it.
Drain holes
A hollow resin print needs a way for the uncured resin inside to drain out, and air to get in; a sealed hollow can also trap resin that later leaks or cracks the part. Drain holes are round holes bored square into the surface, through the wall into the hollow.
- With the part picked, press Add Drain Holes. The button reads Click on the Part... while it is waiting.
- Click on the picked part where you want a hole. It works with the parts together or pushed apart. A click on another part is refused, with a notice to click on the part picked in the Parts list.
- Click again for more holes. Esc stops.
Diameter sets the next hole’s size (4 mm to start), or the selected hole’s. The picked part’s holes are listed under it (“Drain Hole 1, 4.0 mm”): click one to select it, and the x beside it deletes it. In the view each hole is a blue ring; grey rings belong to a part that is not hollowed — drain holes are only bored when their part is hollow, and the accordion warns you of that.
Where to put them: low down on the part as it will stand on the printer, where the resin drains, and in a place that is easy to fill and sand afterwards. Two holes, one near each end, let air in as the resin runs out. On a cut part, a hole on a cut face is hidden once the model is assembled.
Looking inside: the Cut Away slider
Down the right side of the view is a tall slider. Drag it down and the model is hidden from the top down, as if a huge box were lowered onto it, until at the bottom it reaches the model’s lowest point. The percentage shows over the slider. Where the box cuts through solid material the cut is drawn flat in the part’s colour, darkened, so a hollow part’s wall reads as a band round its empty inside — and you can see sockets, keys and drain holes from the inside. Parts pushed apart are cut at the same height of the model.
Double-click the slider to see the whole model again. It changes only the view: the parts, the exported files and the assembly picture stay whole, and it is instant at any size because nothing is rebuilt.
Thin walls
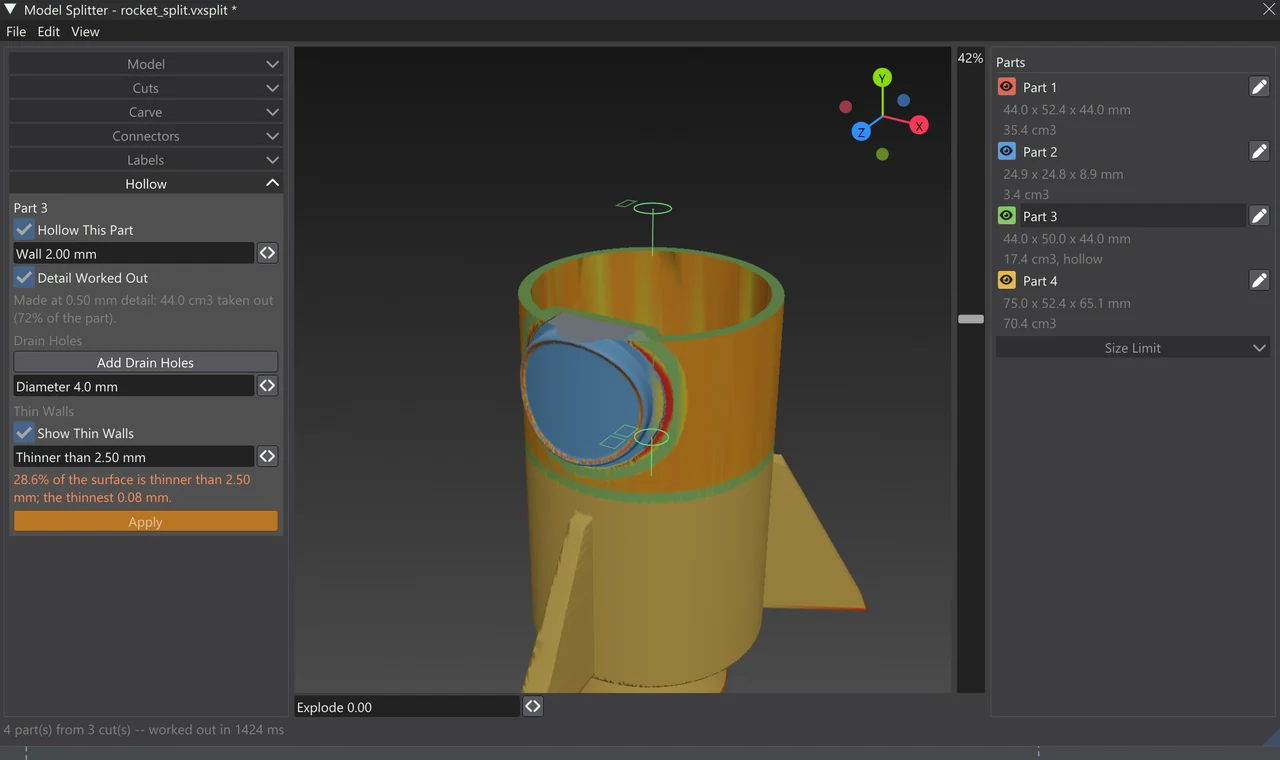
Under Thin Walls, tick Show Thin Walls (also in the window’s View menu) to colour the parts by how thick they are. Each point is measured straight in, to the surface on the other side. It works on every part, hollowed or not, and is a check on the model itself: where it is too thin to survive, whatever printer makes it.
- The Thinner than slider sets the limit (1 mm to start): about 1 mm suits plastic, about 0.5 mm resin. Use what your printer and material can make and keep.
- The heat map is red where the part is thinner than half the limit, yellow at the limit, and blends into the part’s own colour where it is half as thick again.
- A line reports the result, for example “3.2% of the surface is thinner than 1.00 mm; the thinnest 0.41 mm.” — in orange when anything is thin, green when nothing is. While the parts are being measured it reads Measuring the walls...
The measuring is done on the graphics card where it can be, so it takes only a moment even on a big model. On a wall that curves away, one ray per point reads it slightly thicker than it is, so treat values near the limit with care.
When hollowing fails
- The wall is too thin for the detail: make the wall thicker, or untick Detail Worked Out and set a finer Detail.
- “The model could not be hollowed: its inside could not be made into a closed surface (the model itself is fine).” This can happen where the inside narrows to almost nothing. Try a thicker wall or a finer detail.
Tips for resin printing
- A wall of 1.5–3 mm suits most resin prints; go thicker for large or heavy parts and for anything that will be handled.
- Always add drain holes to a hollow part — at least two, 3–5 mm across, low down as the part will stand on the build plate.
- Check the result with the Cut Away slider before you export, and run Show Thin Walls at your resin’s limit.
- Hollow before you cut when you can: every piece stays hollow, each sealed across its cut faces, with keys rather than pegs to join them.
- Rinse and cure the inside too: wash resin out through the drain holes before curing, or it stays liquid in the hollow.
Editions
Hollowing, drain holes and the thin-wall check are in the Ultra edition. In other editions the Hollow accordion is shown locked, and a working file with hollowed parts opens with those parts left solid. The Cut Away slider is in every edition.