
General Interface
Vertexix exists to take a heavy, messy model and carry it through one focused pipeline: load it, select which materials need work, retopologize them, unwrap UVs, bake the original detail back on as textures, and export. This section orients you to the window itself — what's on screen, and the one idea that shapes almost every panel in the app — before the rest of the manual walks through each panel in detail.
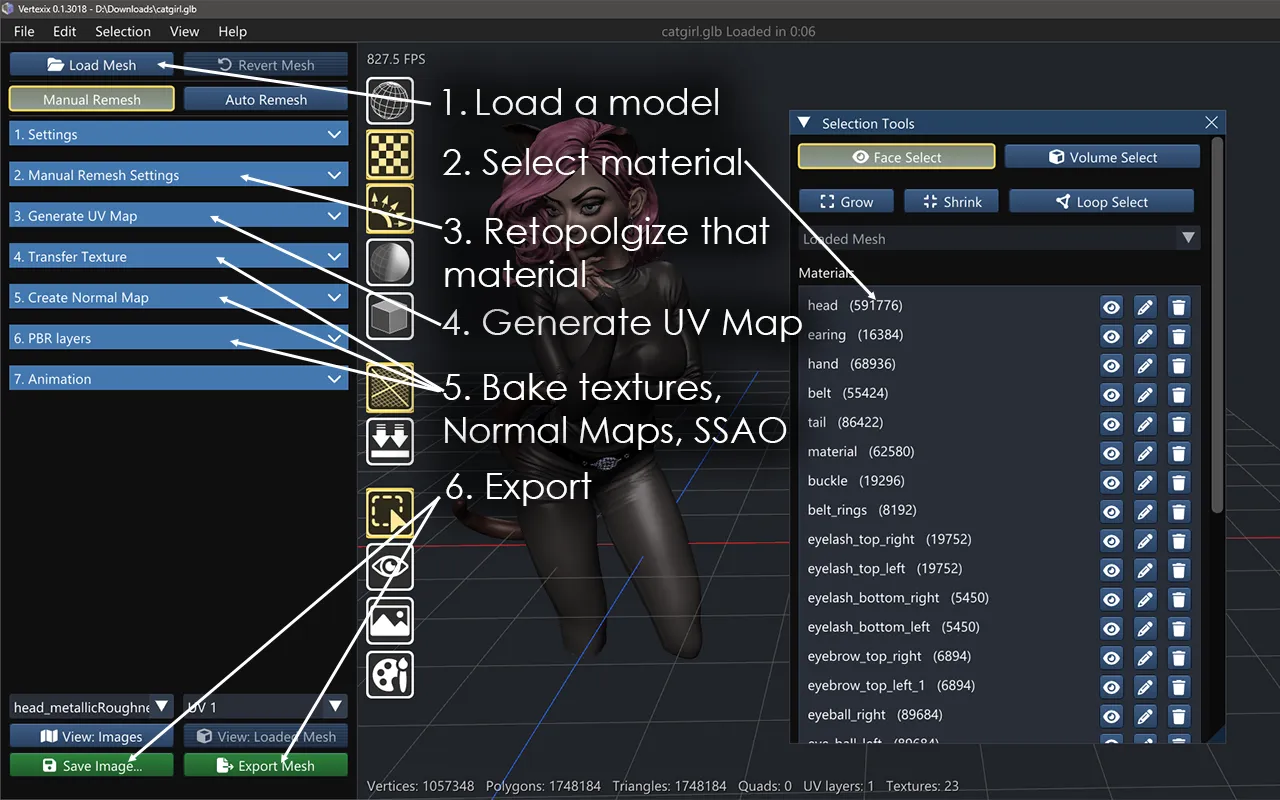
The pipeline, at a glance
- Load a model — glTF/GLB, FBX, OBJ, Collada, and more.
- Select one or more of its materials in Selection Tools.
- Retopologize just those materials — with Manual Remesh or Auto Remesh — or Pass Through to copy them unchanged.
- Generate a UV map for the new topology.
- Bake textures, normal maps and AO from the original model onto the new one.
- Export.
Steps 2–5 are per material, and the created topology is built up by appending piece by piece as you work through your model's materials one at a time.
The four sidebar modes
A row of four tabs at the top of the sidebar switches what the sidebar is for. The menu bar, viewport and windows stay the same; the sidebar's controls change with the tab.
| Tab | What it is for |
|---|---|
| Retopology | The main pipeline above: Load Mesh, then Auto Remesh, Manual Remesh and Quad-Patch (which opens the Quad-Patcher), UV mapping, baking and export. R by default jumps here from Paint or Sculpt. See Getting Started. |
| Paint | Texture painting with image brushes, layers, masks and fills (Ctrl+P by default). See Paint Palette. |
| Sculpt | Sculpting brushes and sculpt layers on whichever mesh is on screen (Shift+S by default; T flips between Paint and Sculpt). See Sculpting. |
| Voxel | Building a model from nothing out of added and cut shapes. The one mode that works before any model is loaded. See Voxel Mode. |
Everything that is not a sidebar accordion is a separate window you can open, move and dock; the Window menu lists them all, and each mode can have its own saved dock layout. See Windows & Dock Layouts.
Two meshes, always
Two meshes exist at all times, and the interface switches between them: the Loaded Mesh (the model you imported) and the Generated Mesh (the topology you're building). Almost every panel — the Image Viewer, Selection Tools, the render-mode settings, even Save Image — has to ask which one is currently on screen, because the two carry entirely different materials, UVs and textures. See Loaded Mesh vs. Generated Mesh for the full explanation and where the toggle lives.
How this manual is organized
The left-hand tree mirrors the app itself: one top-level section per major panel or window (Manual Remesh, Auto Remesh, Selection Tools, Image Viewer, Paint Palette, Sculpting, Voxel Mode, Node Texturing, OpenGL View, PBR View, Settings, Exporting), each broken down into one page per accordion, tab, or distinct feature inside it. A few pages — Generate UV Map, Transfer Texture, Create Normal Map, Extra Actions and Animation — are identical panels shared by both remesh workflows, so they're documented once and linked from both.